What’s Old Is New

It’s take many years to build up your kitchen inventory. One thing that was lacking for me for a long time was serving dishes/platters. I mean I had plates and stuff, but very few platters that I felt were really worthy of serving to company. Well, this year, I was gifted with the most beautiful platters and serving pieces, EVER. These things are old. And used. Maybe you’re turning your nose up at this, but I’m not. They may be old and used, but really, that’s code for vintage and well loved. And these awesome pieces are made of milk glass! It’s become my little obsession.

If you’re interested in having some gorgeous milk glass of your own, check out some local antique shops or as I’m fond of, shopping on a local exchange on Facebook. I think these pieces make great gifts also! So with Christmas right around the corner, milk glass may be that perfect, unique gift you’re looking for. Plus, it’s classic and timeless and will never go out of style. And the history of having an old piece is just an added bonus!

These two bowls are actually a punch bowl and base that function as smaller bowls as well.

These two bowls are actually a punch bowl and base that function as smaller bowls as well.

Now if this isn't the most beautiful punch bowl....

Now if this isn’t the most beautiful punch bowl….

My 9 year old arranged those flowers for me!

My 9 year old arranged those flowers for me!

And this is my most favorite platter, EVER. Love the scalloped edging.

And this is my most favorite platter, EVER. Love the scalloped edging.

Advertisement

DIY Christmas Decor

As far as Christmas decorating goes, that pretty much falls on the man of the house. At least, the outside of the house. He’s very into the lights being just so and all that. Tight and straight, no sagging lights. For a couple years, he even decorated the street light in front of our house. The whole entire thing! Yes, the enormous concrete pole. It took a huge ladder propped against the pole and laying halfway into the street, with our neighbor watching and making sure a car wouldn’t run right into it. Last year I insisted he NOT do that again, since I’m pretty sure I lost a few years of my life watching him do that.

This year, I decided to change things up a little bit from the standard indoor decorations we usually have. But decorations are expensive (unless you get them AFTER Christmas) so I went the semi-homemade route. And I’m very simple about holiday decorating. Kudos to you people out there that switch out everything! The bathroom, the kitchen, EVERY ENTIRE THING IN YOUR HOUSE! I’m not up for that kind of work, nor do I have room to store everything. So simple it is! Here’s some mason jars that I filled with sand (from my very own backyard) and holly that I got on sale at Michaels. The ribbon was leftover from Christmas last year.

decor 3I also saw this Christmas card holder on a boutique website that they were originally selling for $12.99 but was marked down to $5.99, not including shipping. And all you got was twine and clothespins. Well, that stuff was sitting in my garage for $0.00, so it got strung up across the mantle. Now I need some more Christmas cards to hang up there!

decorI got these pinecones at the park on my street a few years ago. I brought them home and Adam spray painted them for me.

decor 2So there you go! Simple, rustic, inexpensive Christmas décor made mostly out of things laying around my house. And I love it all!! But if you don’t happen to have this type of stuff laying around, any kind of dollar store will most likely have some things to get you started. P.S. Dollar Tree is my favorite!

And this Christmas tree is planted in my front yard. We bought it three years ago because we wanted a live, uncut tree that we could plant and watch grow over the years. When we got it, it was only about a foot and a half tall. Now, it stands about 7 feet tall!!! If I had a bigger yard, I’d buy a live tree and plant it every year.

tree

Potato Cheese Chowder

potato cheese chowder 3Rain is in the forecast! Not that I really want it to rain because that means I have to clean a total of 8 Boxer paws whenever they go outside and need to come back in (which will be immediately after exiting the house), but I just really want to comfortably wear long sleeves and boots. I’d prefer cool comfortable weather, but one day of rain, I’ll take it.

As for the lack of pictures for this recipe, I apologize. This meal came about because I literally had no meat at all in the freezer. But I did have some bacon. And some potatoes. And it was slightly cool out so I decided to make some soup with what was laying around. I wasn’t sure if it would be that great so I didn’t take very many pictures. Well lo and behold, my favorite man told me that this soup may have surpassed Corn & Cheese Chowder! *gasp* That is a huge compliment because Corn & Cheese Chowder is by far my favorite soup, EVER. And he thoroughly enjoys it too. So that big of a statement means it’s good.

I know the rest of you are probably already cold and long overdue for a comforting recipe. So here you go!

Potato Cheese Chowder

  • 6 bacon slices, chopped
  • 1/2 onion, chopped
  • 6 medium sized potatoes, peeled and chopped
  • 2 garlic cloves
  • 4 cups chicken broth
  • 2 cups half & half
  • 3 tbsp. flour
  • 1/2 tsp. thyme, dried
  • 1/2 tbsp. black pepper
  • 1 1/2 c. shredded sharp cheddar cheese
  • dash cayenne pepper

In a stock pot of Dutch oven, heat on medium. Add bacon and cook until almost crisp. Add the onions and saute for a few minutes, then add the garlic and potatoes. Cook, stirring for 3 minutes. Add in broth and all of the seasonings. Bring to a boil, cover, reduce heat and let simmer for 12-15 minutes. Turn all the way to low and with an immersion blender, pulse 2-3 times. Mix together the flour and half & half, using a whisk (this is a slurry). Add into the soup and bring back up to a boil. At this point it will thicken. Once thickened, reduce heat, add in cheese and stir. That’s it!

potato cheese chowder 2potato cheese chowderGreat additions to this soup would be extra bacon crumbled on top or even some chives. Like I mentioned above, I was really limited on what I had on hand in my kitchen and this soup as is was delicious! Also, if you don’t have an immersion blender, a hand masher or even putting a portion of the soup into a blender will do. Using the immersion blender will smooth out the soup but just pulsing it a couple times ensure texture.

Are You Thankful?

It’s the day after Thanksgiving. A lot of you are out shopping those awesome Black Friday deals. Which I’ll admit, I’ve never gone out and experienced because it seems pretty crazy out there. I’m more of an online person and I’ve gotten some great deals from the comfort of my office at home.

Aside from the shopping, I wanted to talk about being thankful and I’m going to be honest here. I feel like a lot of blogs are full of sunshine and rainbows. Simply put, the person penning the blog looks like they have a perfect life. I know I don’t want to read ALL of the negative going ons in your life, but I LOVE honesty. And a little more of it would be much appreciated so us normal people will actually feel normal, and not like our lives are so incredibly imperfect. So here’s a little honesty for you. And I hope you feel it’s refreshing.

I’m thankful for my smart, healthy and beautiful children. But you know what? They drive me crazy! You identify with that, don’t you? I know we all don’t have the patience of Michelle Duggar. I sure don’t. Bless her heart, but I wish I did. Not so though! The little people in my life cause gray hairs to sprout, give me splitting headaches and cause me to yell loud enough that my neighbors must think I’m on the edge. Sometimes, I feel close to it! But beneath all that, I love those little girls. I’d do anything for them. I’m grateful they’re mine.

I’m thankful for my husband and the health of myself and the people I love. I think these are two things that people overlook all the time. I really could go on and on about these subjects so I’ll leave it at that.

I’m thankful for my family and friends. We’ve had quite the interesting year. Family has exited our lives and old friends have returned. These situations have caused a lot of strong emotions to run high but I’ll say this… For the people who choose to be in my life and who I choose to include in my life, I’m thankful for them. And I think it’s a two way street for them as well.

I’m thankful for the roof over my head. Throughout the year, I complain about what’s broken, what needs fixing and so on. If you’re a homeowner, you understand. But really, I could have no home that needs updating, needs fixing or anything of the sort. So yes, I’m thankful to have a home.

Those are just a few things I wanted to mention. Here’s the thing though. Although it was Thanksgiving and I was reminded of what I needed to be thankful for, I’m not thankful everyday of the year. And I should be.

Are You Thankful?

Skillet Cinnamon Apple Cobbler

cobbler 10
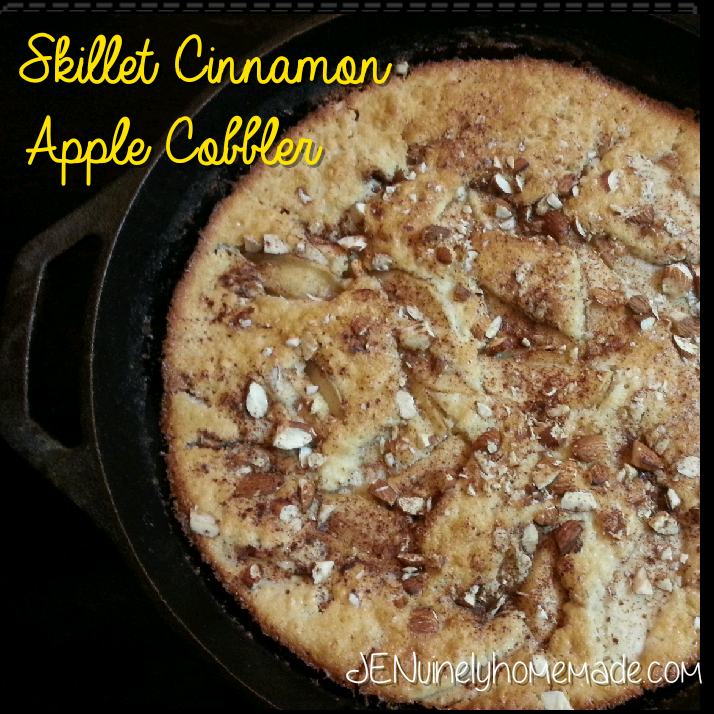
I told you I’d be cooking up a cobbler with those cinnamon apples! And lucky for you, it’s just in time for Thanksgiving. There’s always the traditional pumpkin, pecan and apple pie but this dessert would be a great detour from your standard Thanksgiving sweets. And it’s cooked and served out of a cast iron skillet. Rustic perfection!

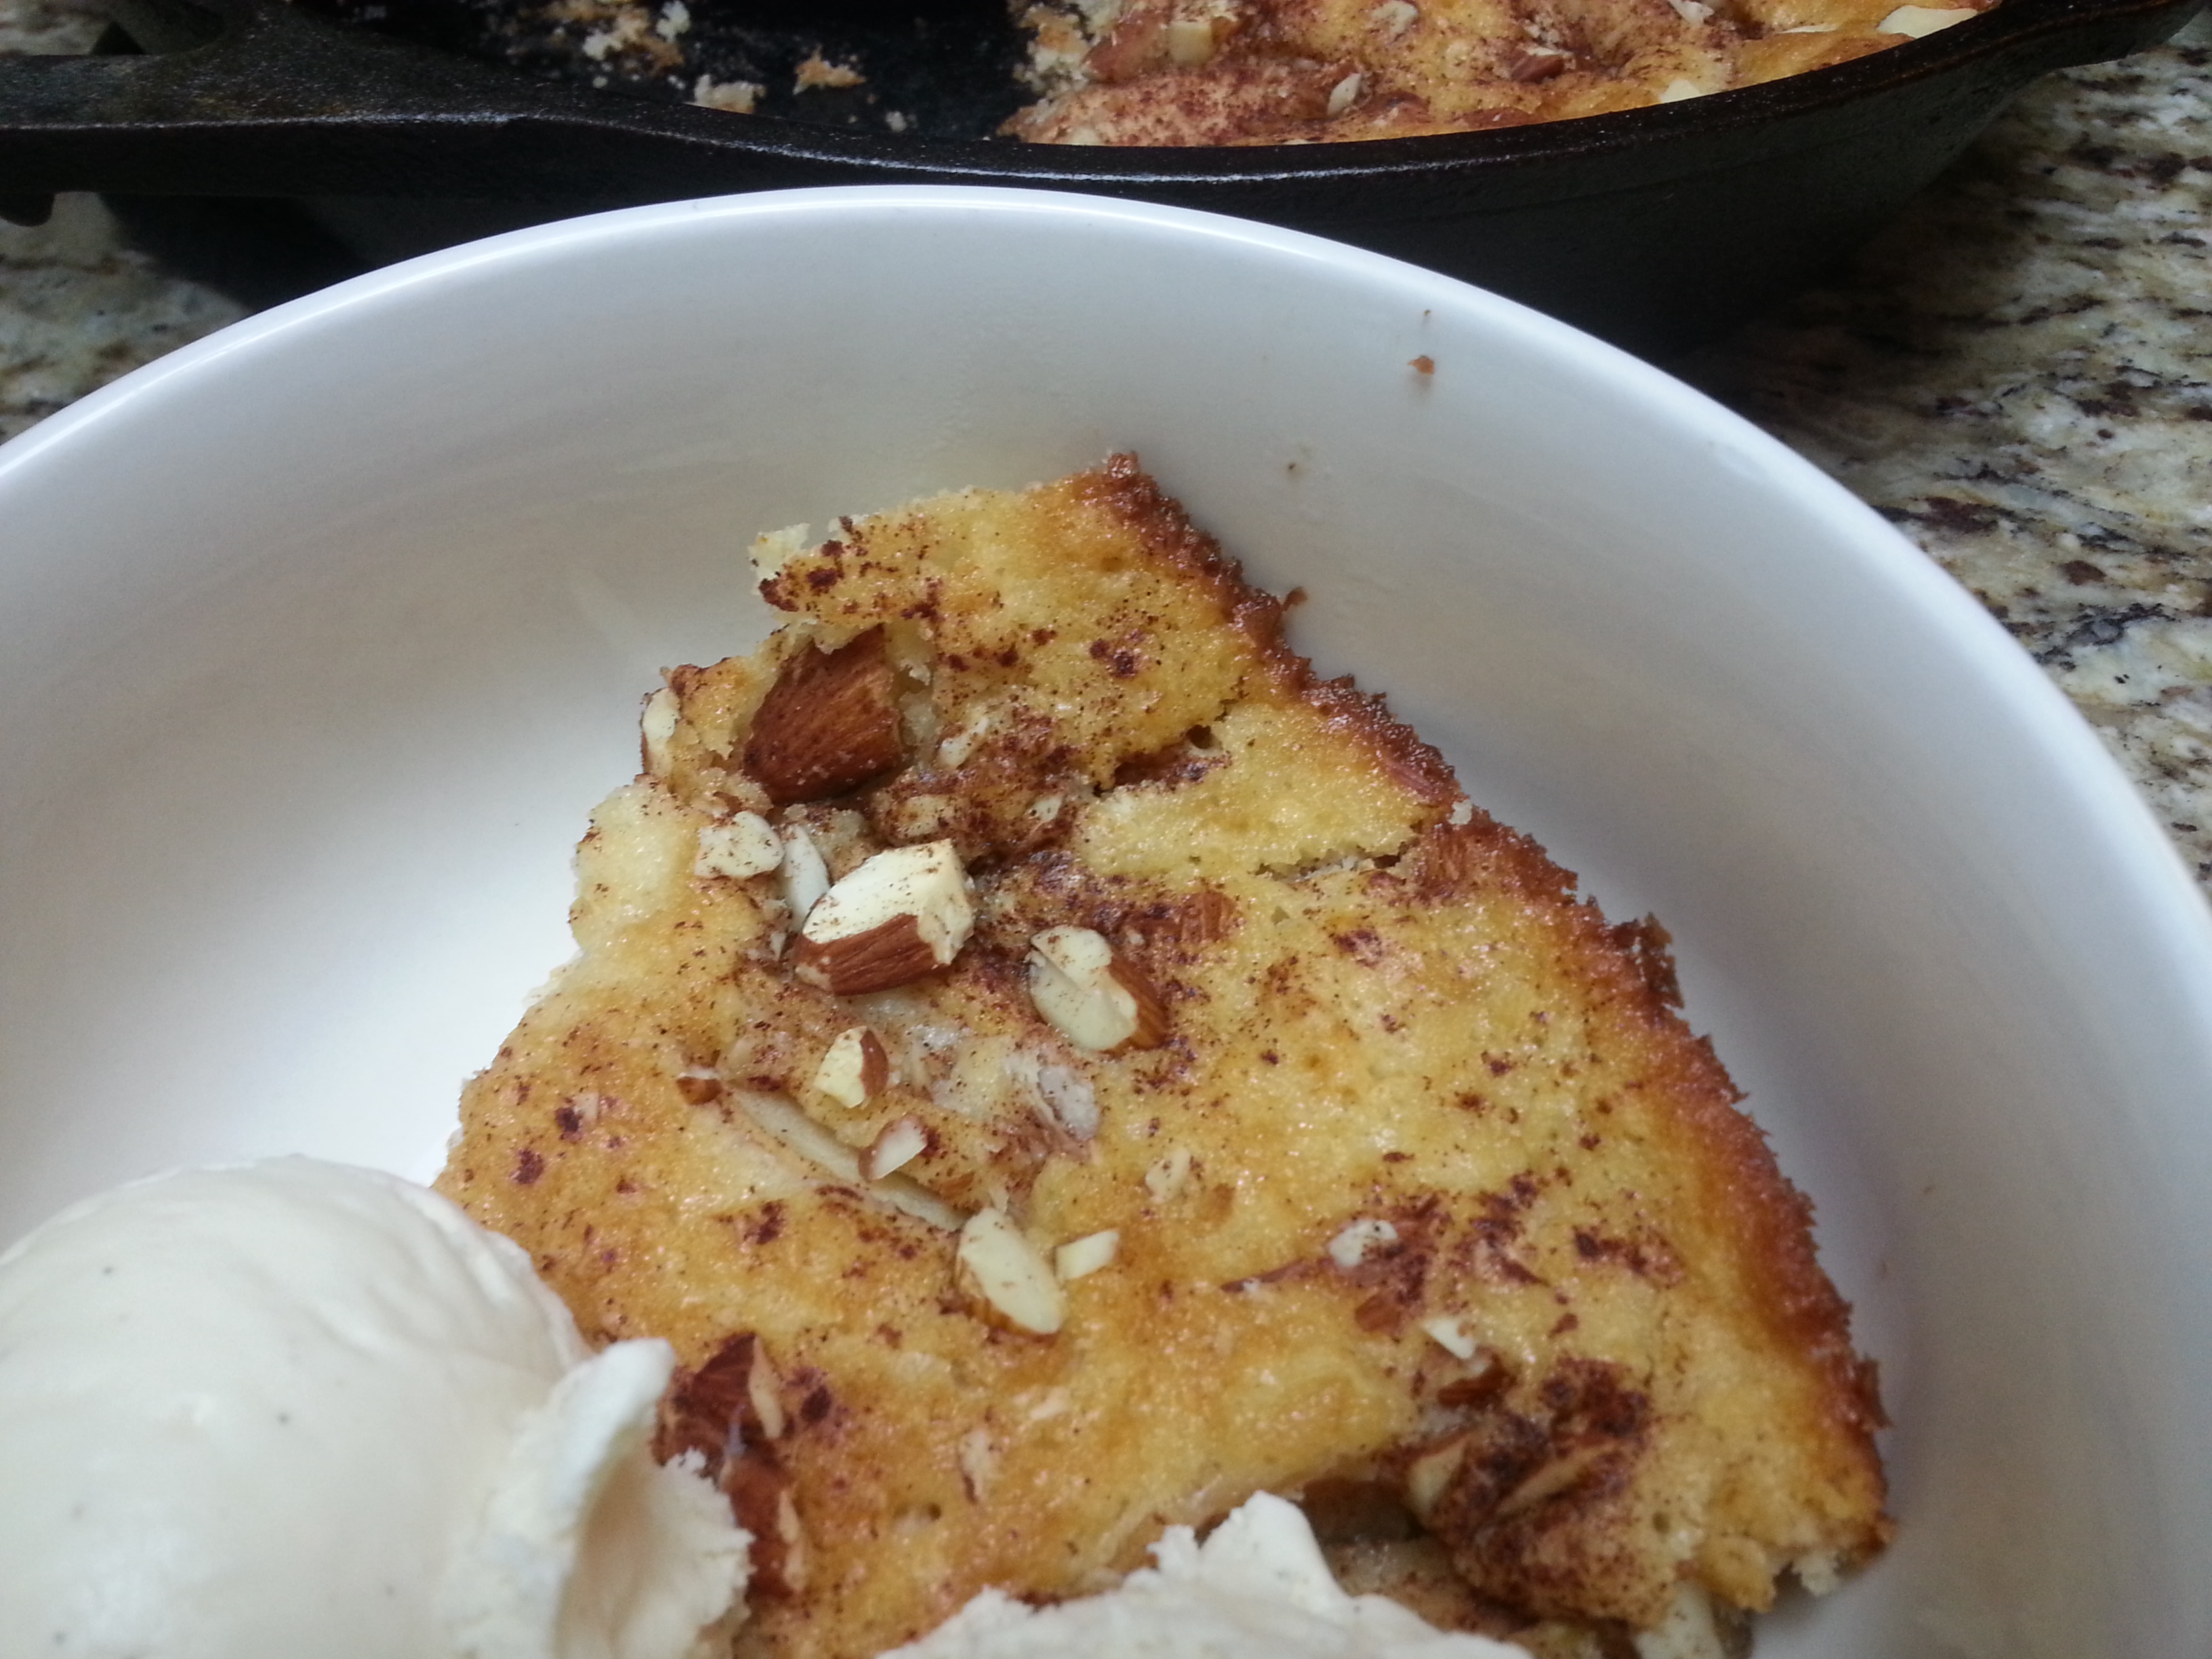
So I altered my standby cobbler recipe that was given to me many years ago and turned it into THIS. I’ll explain to you how much I enjoyed eating this. Typical night in my house goes like this. After the kids are in bed, my hubs and I cuddle on the couch, watching TV and eating dessert. Together, alone, nice and quiet, no interruptions. Well, of course, I happened to let the dog out before I sat on the couch and just as I’m digging in and going “yum”, she’s scratching at the door to be let in. Hubs says he’ll get up and let her in. I pause the DVR, he lets her in, and goes upstairs to close her crate. By the time he gets back, I have ONE bite left. And not only was there cobbler in my bowl, but I also had a scoop of vanilla ice cream and milk poured all over it. Yes, I’m a glutton. But the plan had been to eat dessert while watching TV. That really didn’t happen but I’m happily blaming that on this delicious cobbler, and not the fact that I’m a sweet tooth pig. But seriously, it’s good. And don’t save it just for holidays because although it will make everyone ooh and ahh on Thanksgiving (it’s pretty in that skillet!), you’ll get that reaction any day of the year. YUM.

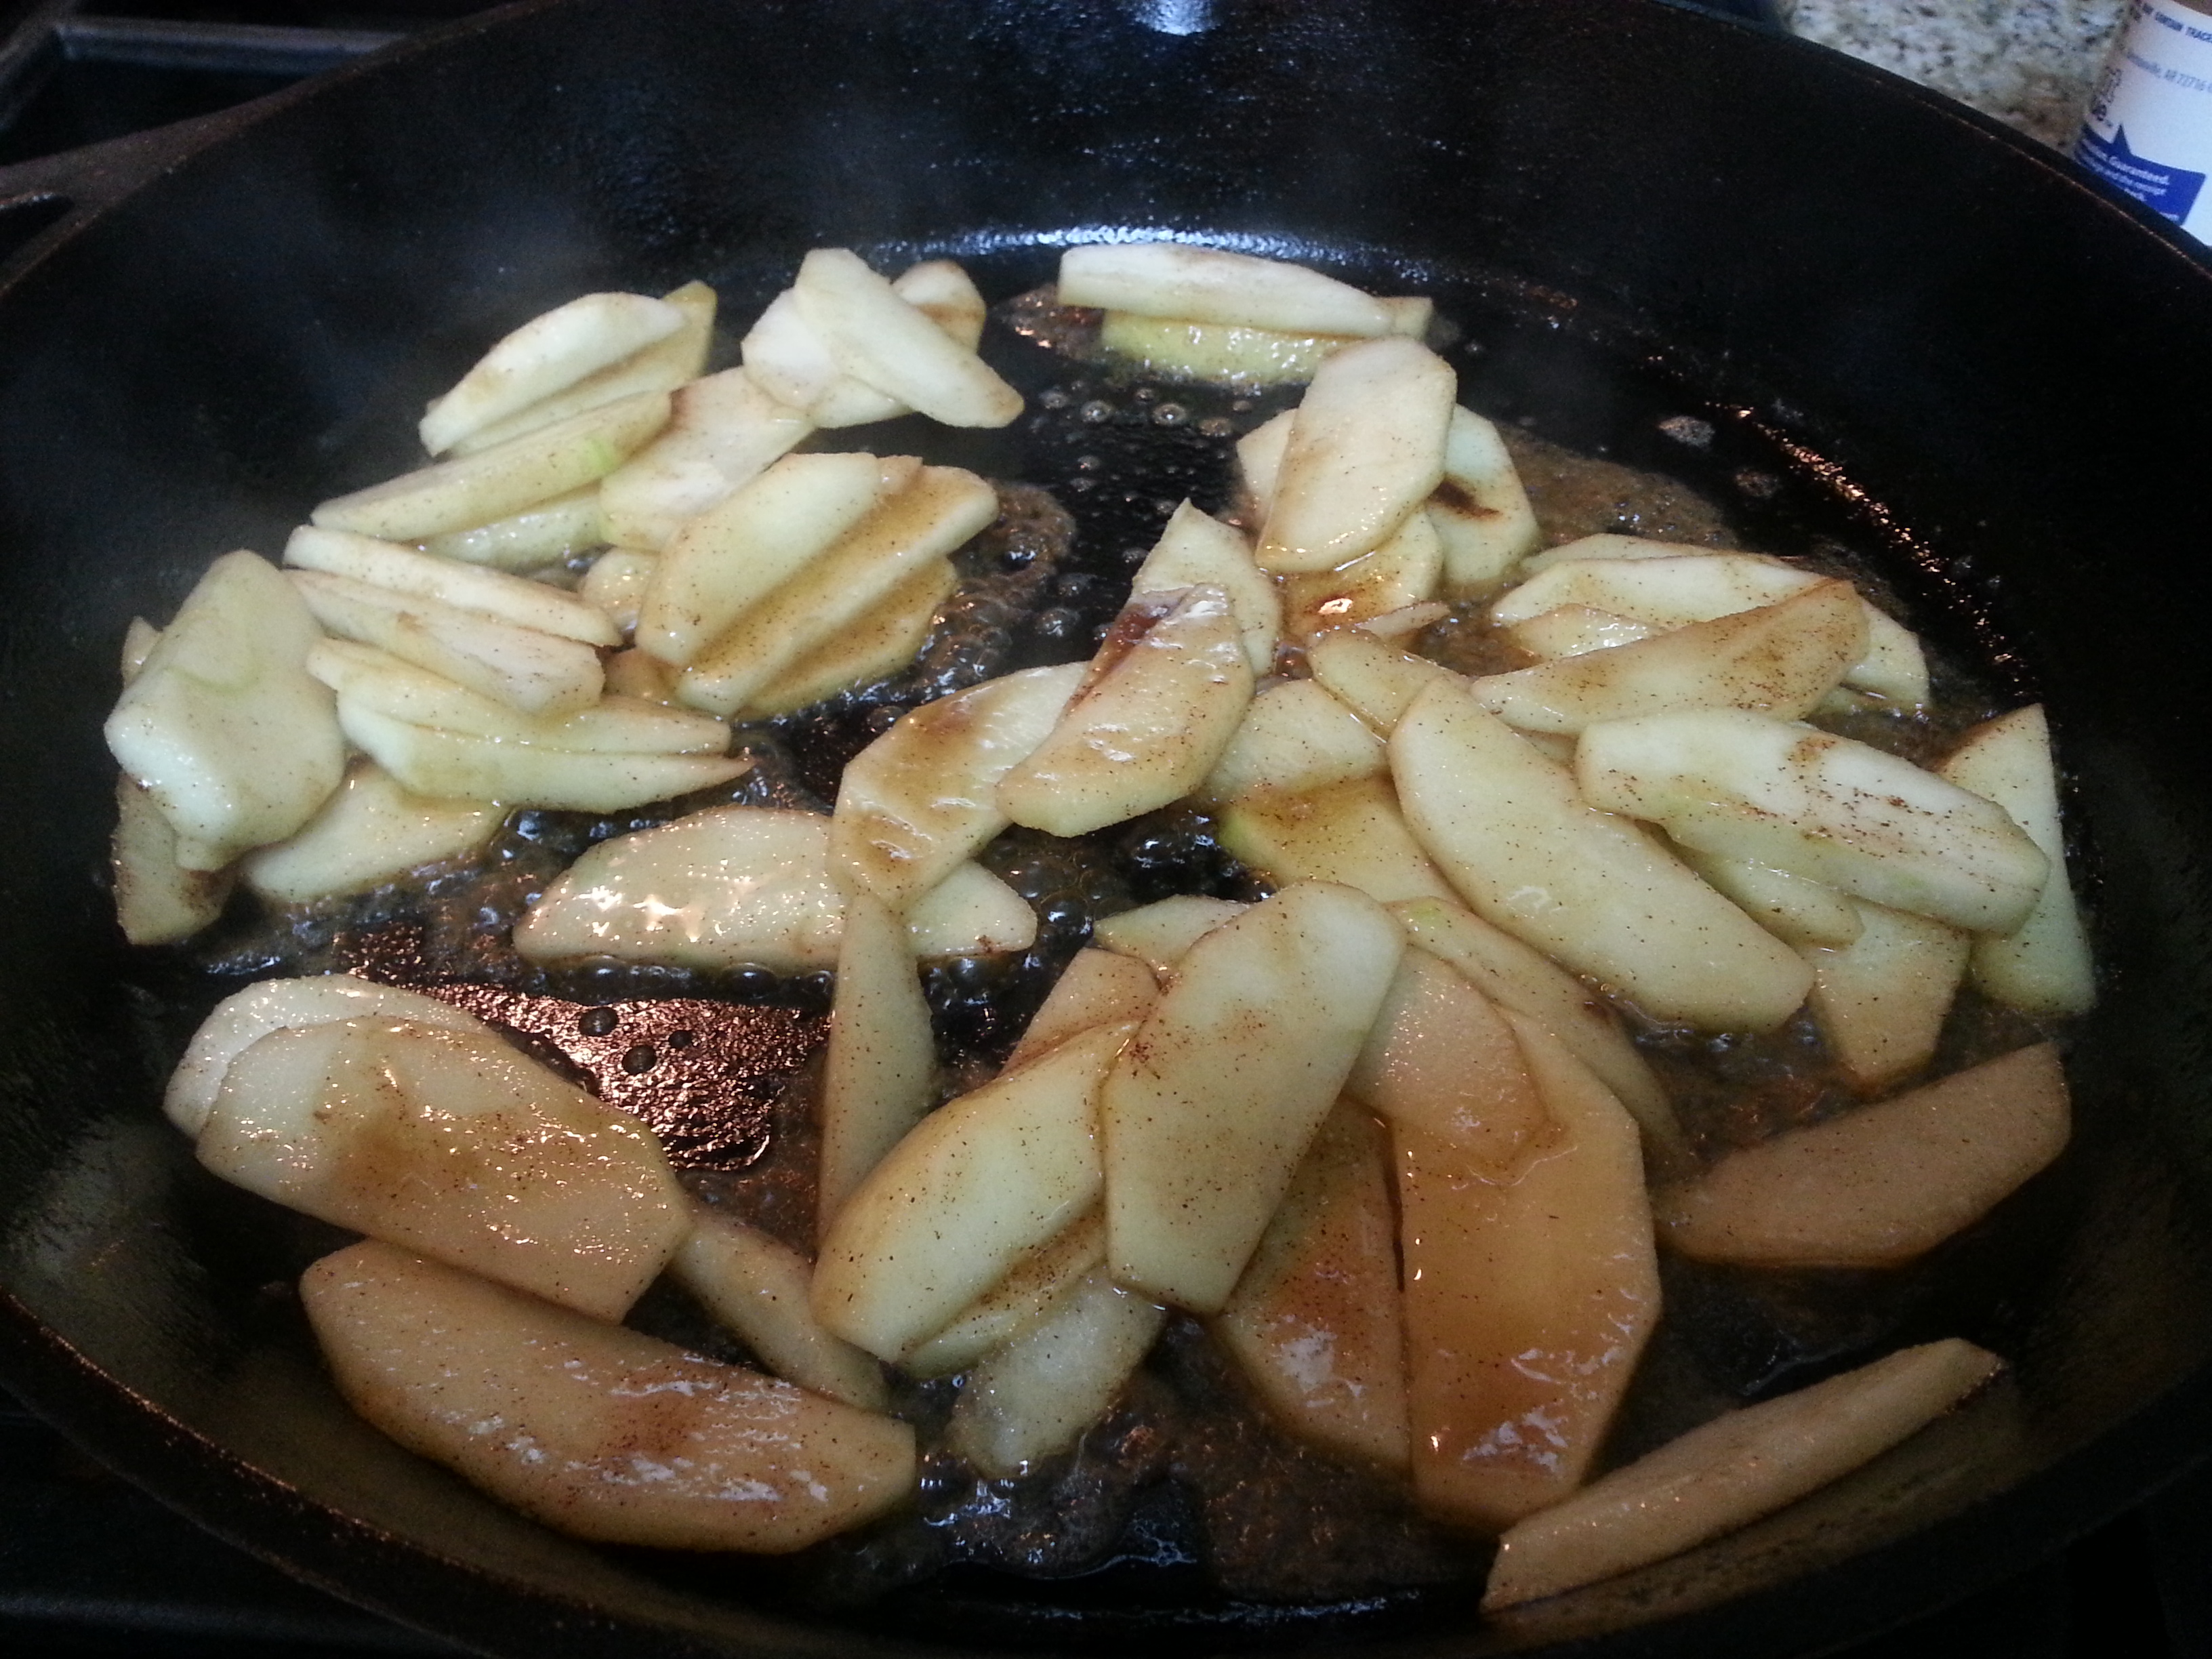
P.S. I reduced the cooking time on the apples since they’ll cook in the oven, omitted the alcohol and held off on adding the nuts until the cobbler was assembled. Aside from that, the apples are the same 🙂

Skillet Cinnamon Apple Cobbler (uses a 12″ cast iron skillet)

  • 2 large apples, peeled, cored and sliced in thin slices (any variety apple will do)
  • 5 tbsp. butter
  • 2 tbsp. brown sugar
  • 1/4 tsp. cinnamon
  • 1/4 c. chopped nuts of your choice (I used almonds, but pecans are screaming at me to use them next time)
  • 1/2 c. white sugar
  • 1 1/2 c. Bisquik (I used the Heart Smart)
  • 3/4 c. milk

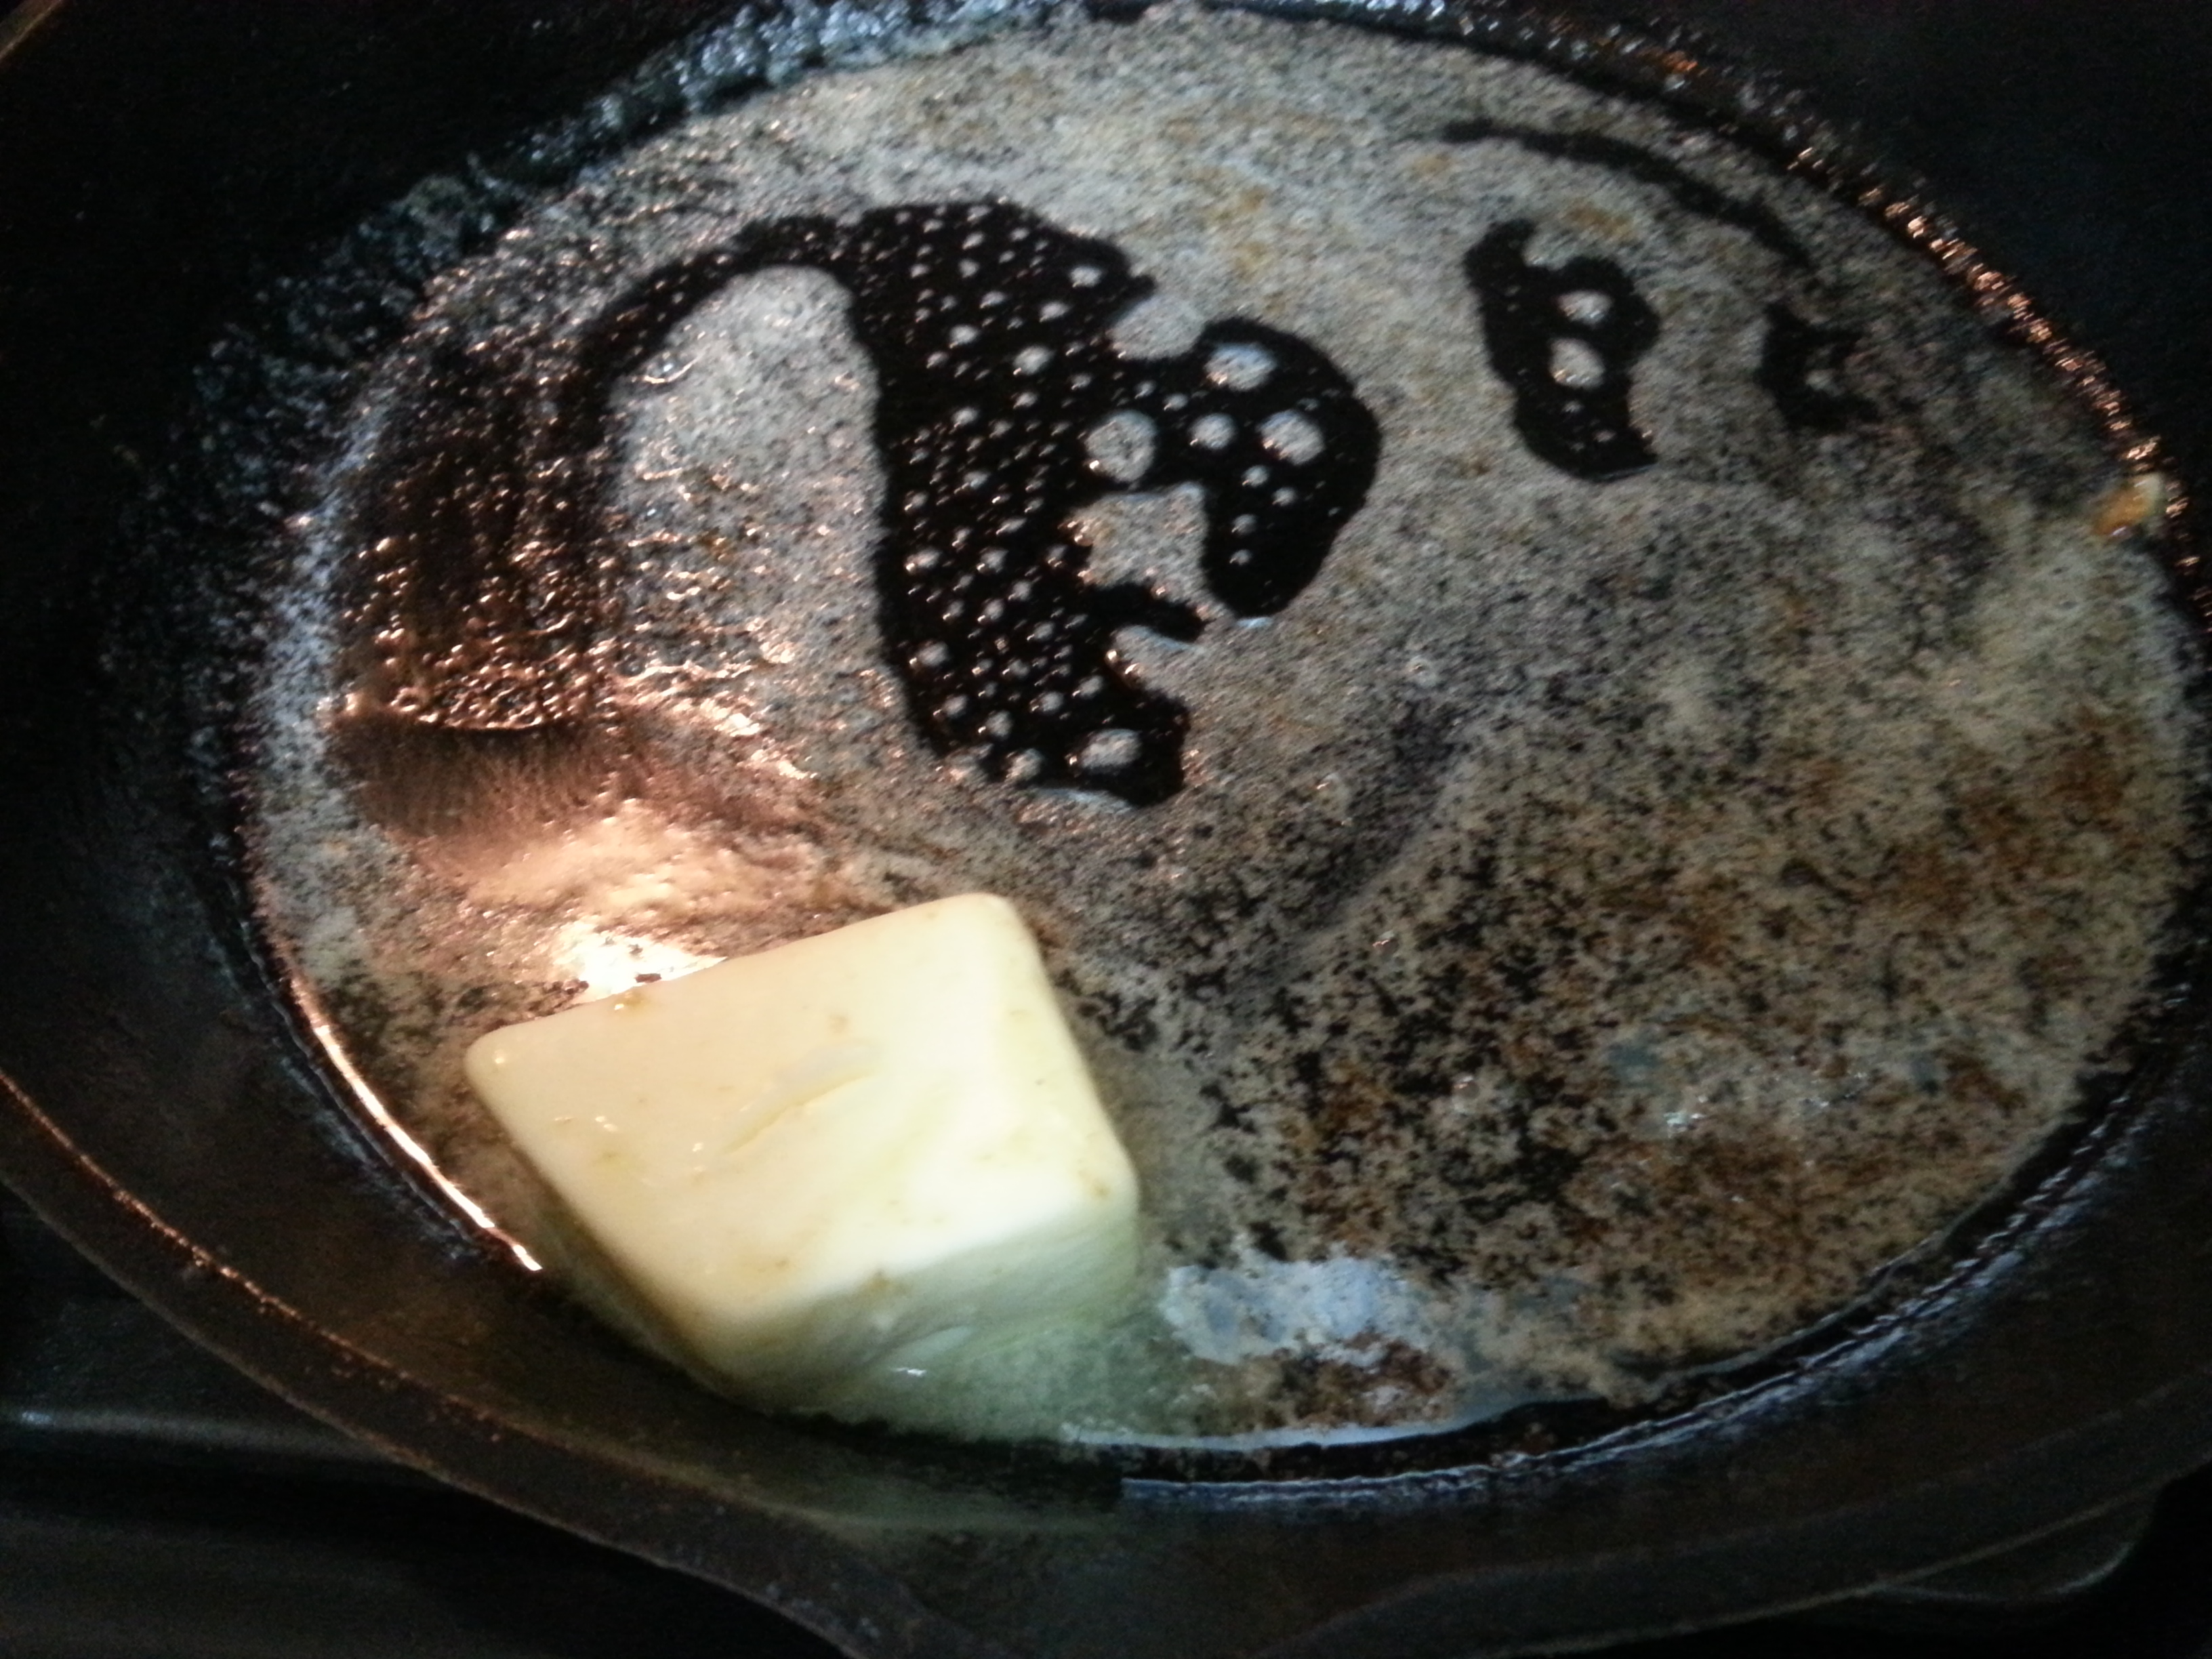
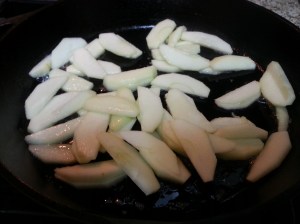
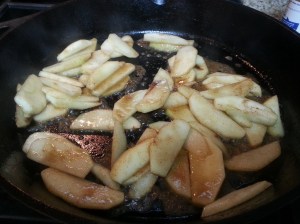
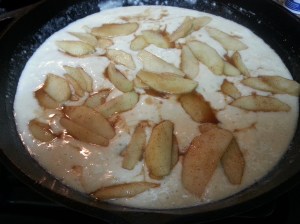
Preheat oven to 400 degrees. Heat a 12″ cast iron skillet over medium heat. Add 1 tbsp. butter and let melt. Add in apples and cook for about 2 minutes. Then add in the brown sugar and cinnamon. Stir. Remove apples into a bowl and set aside.

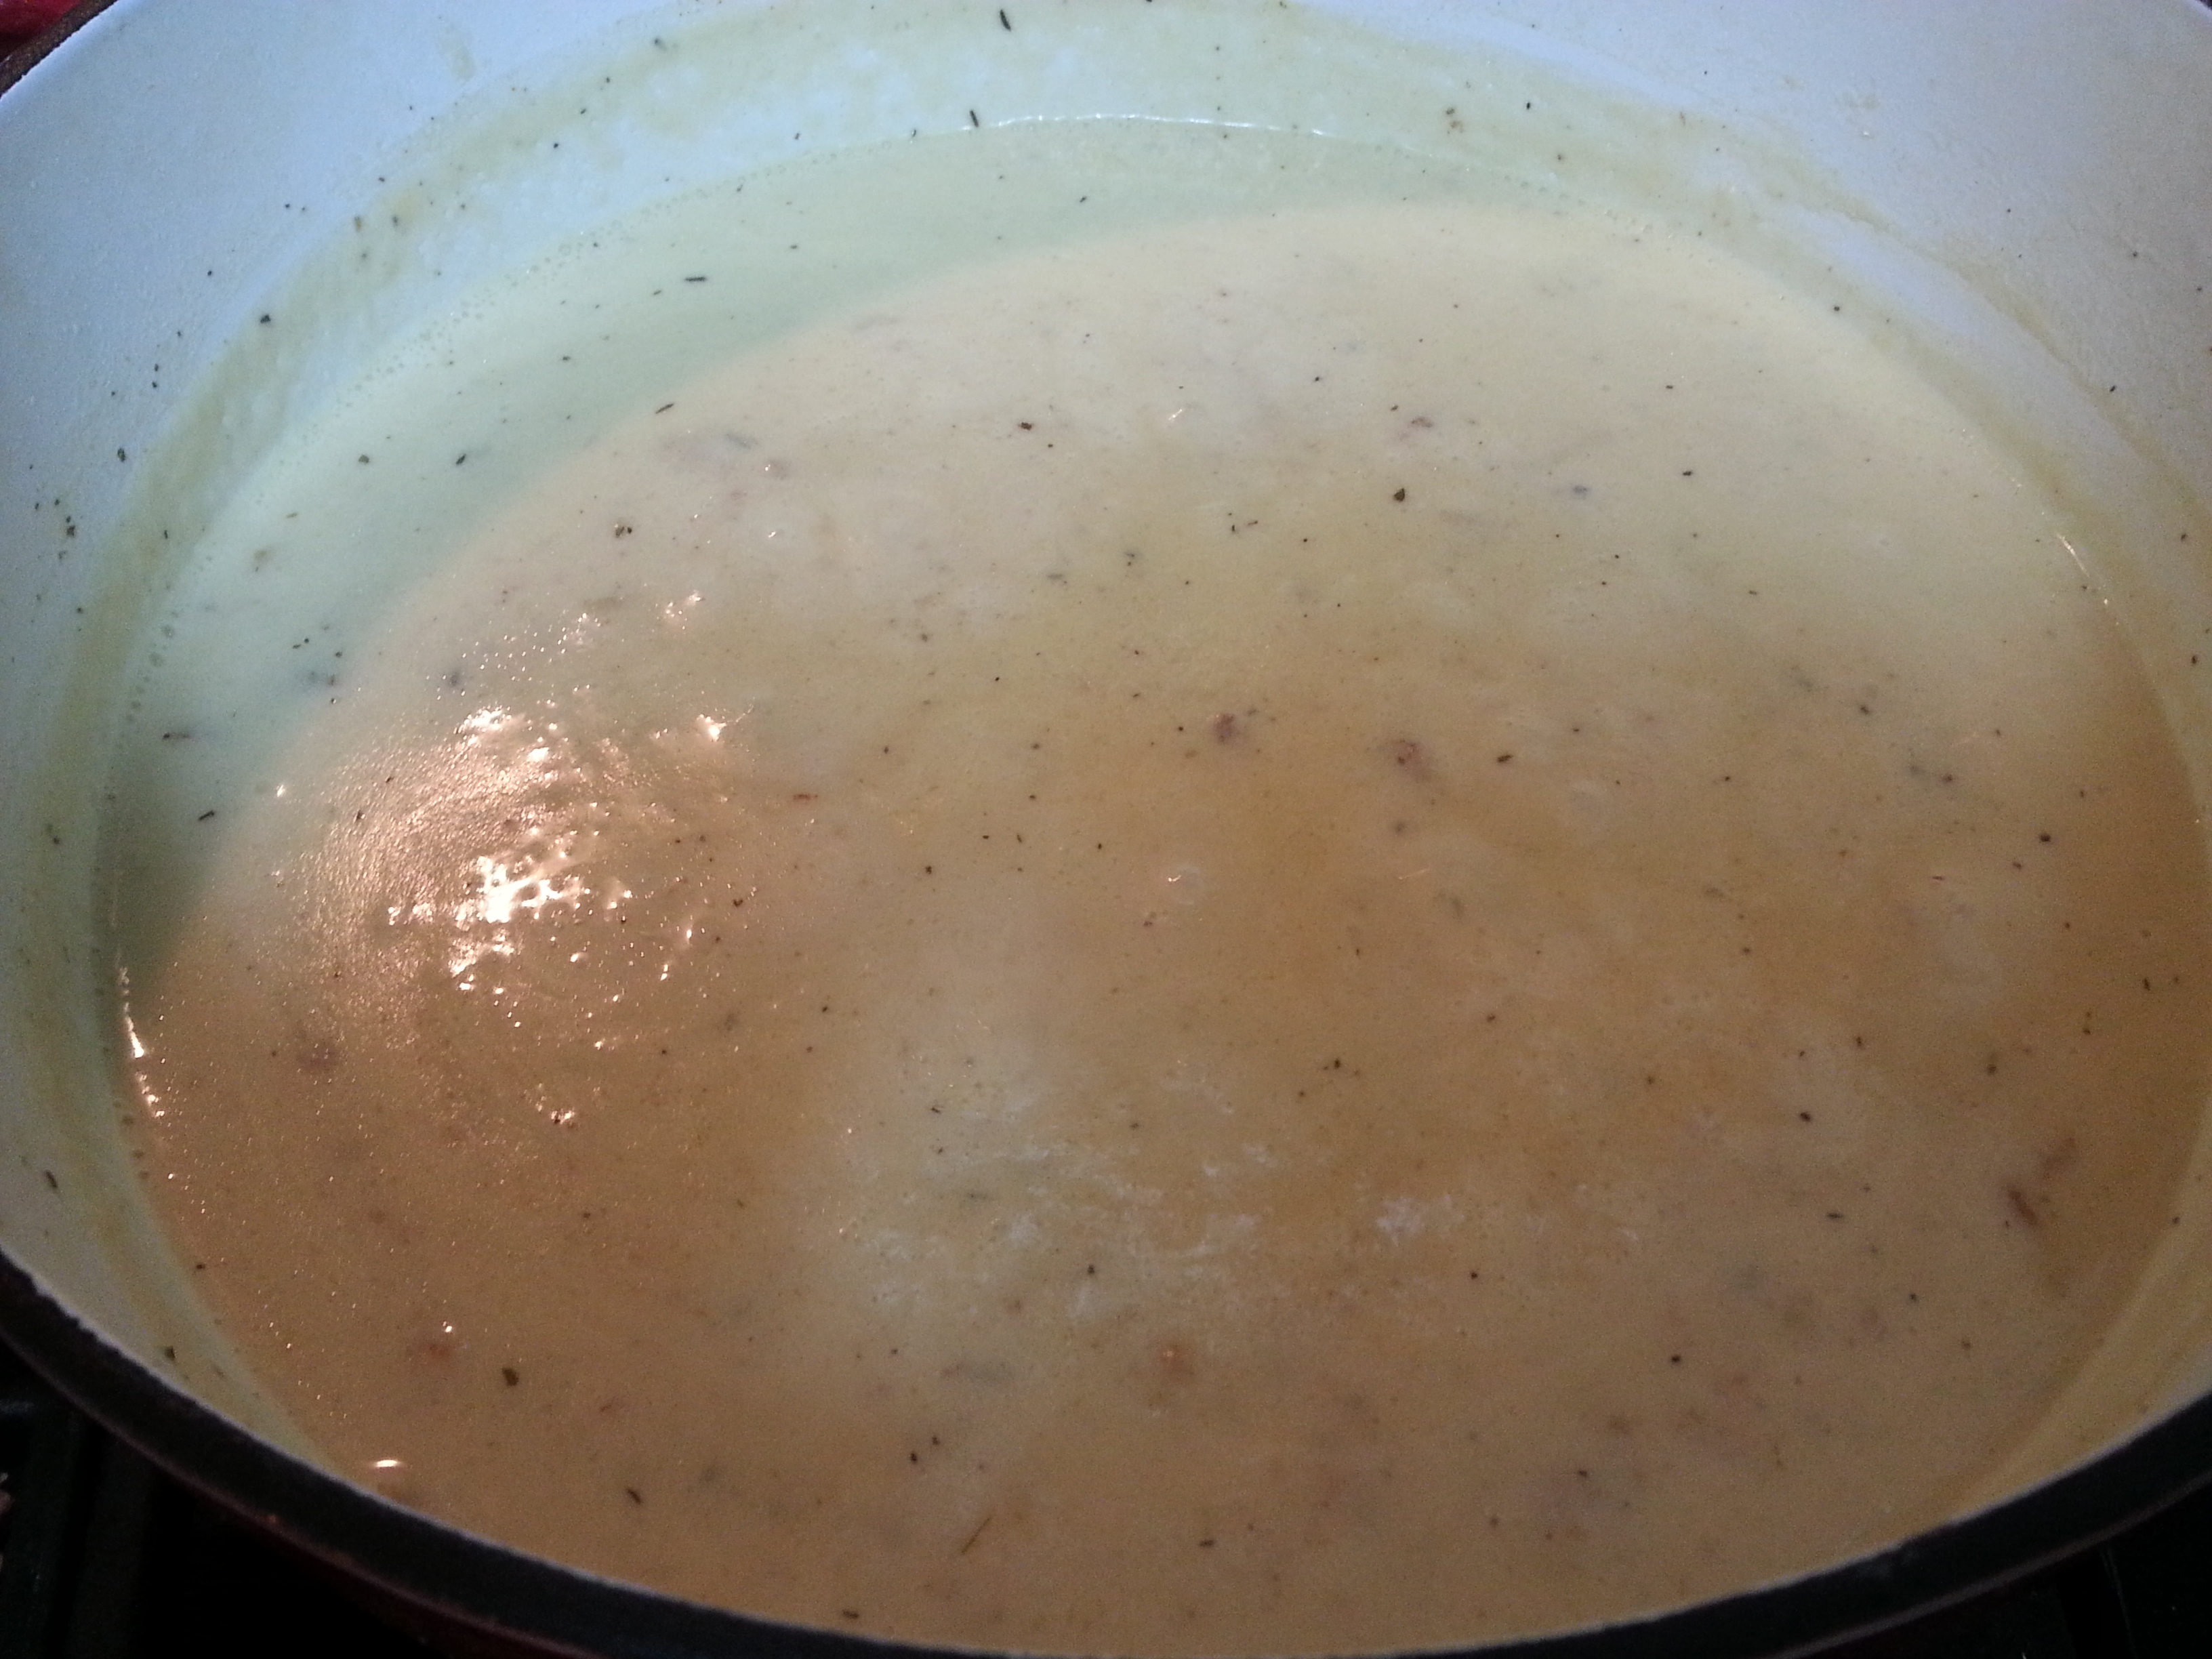
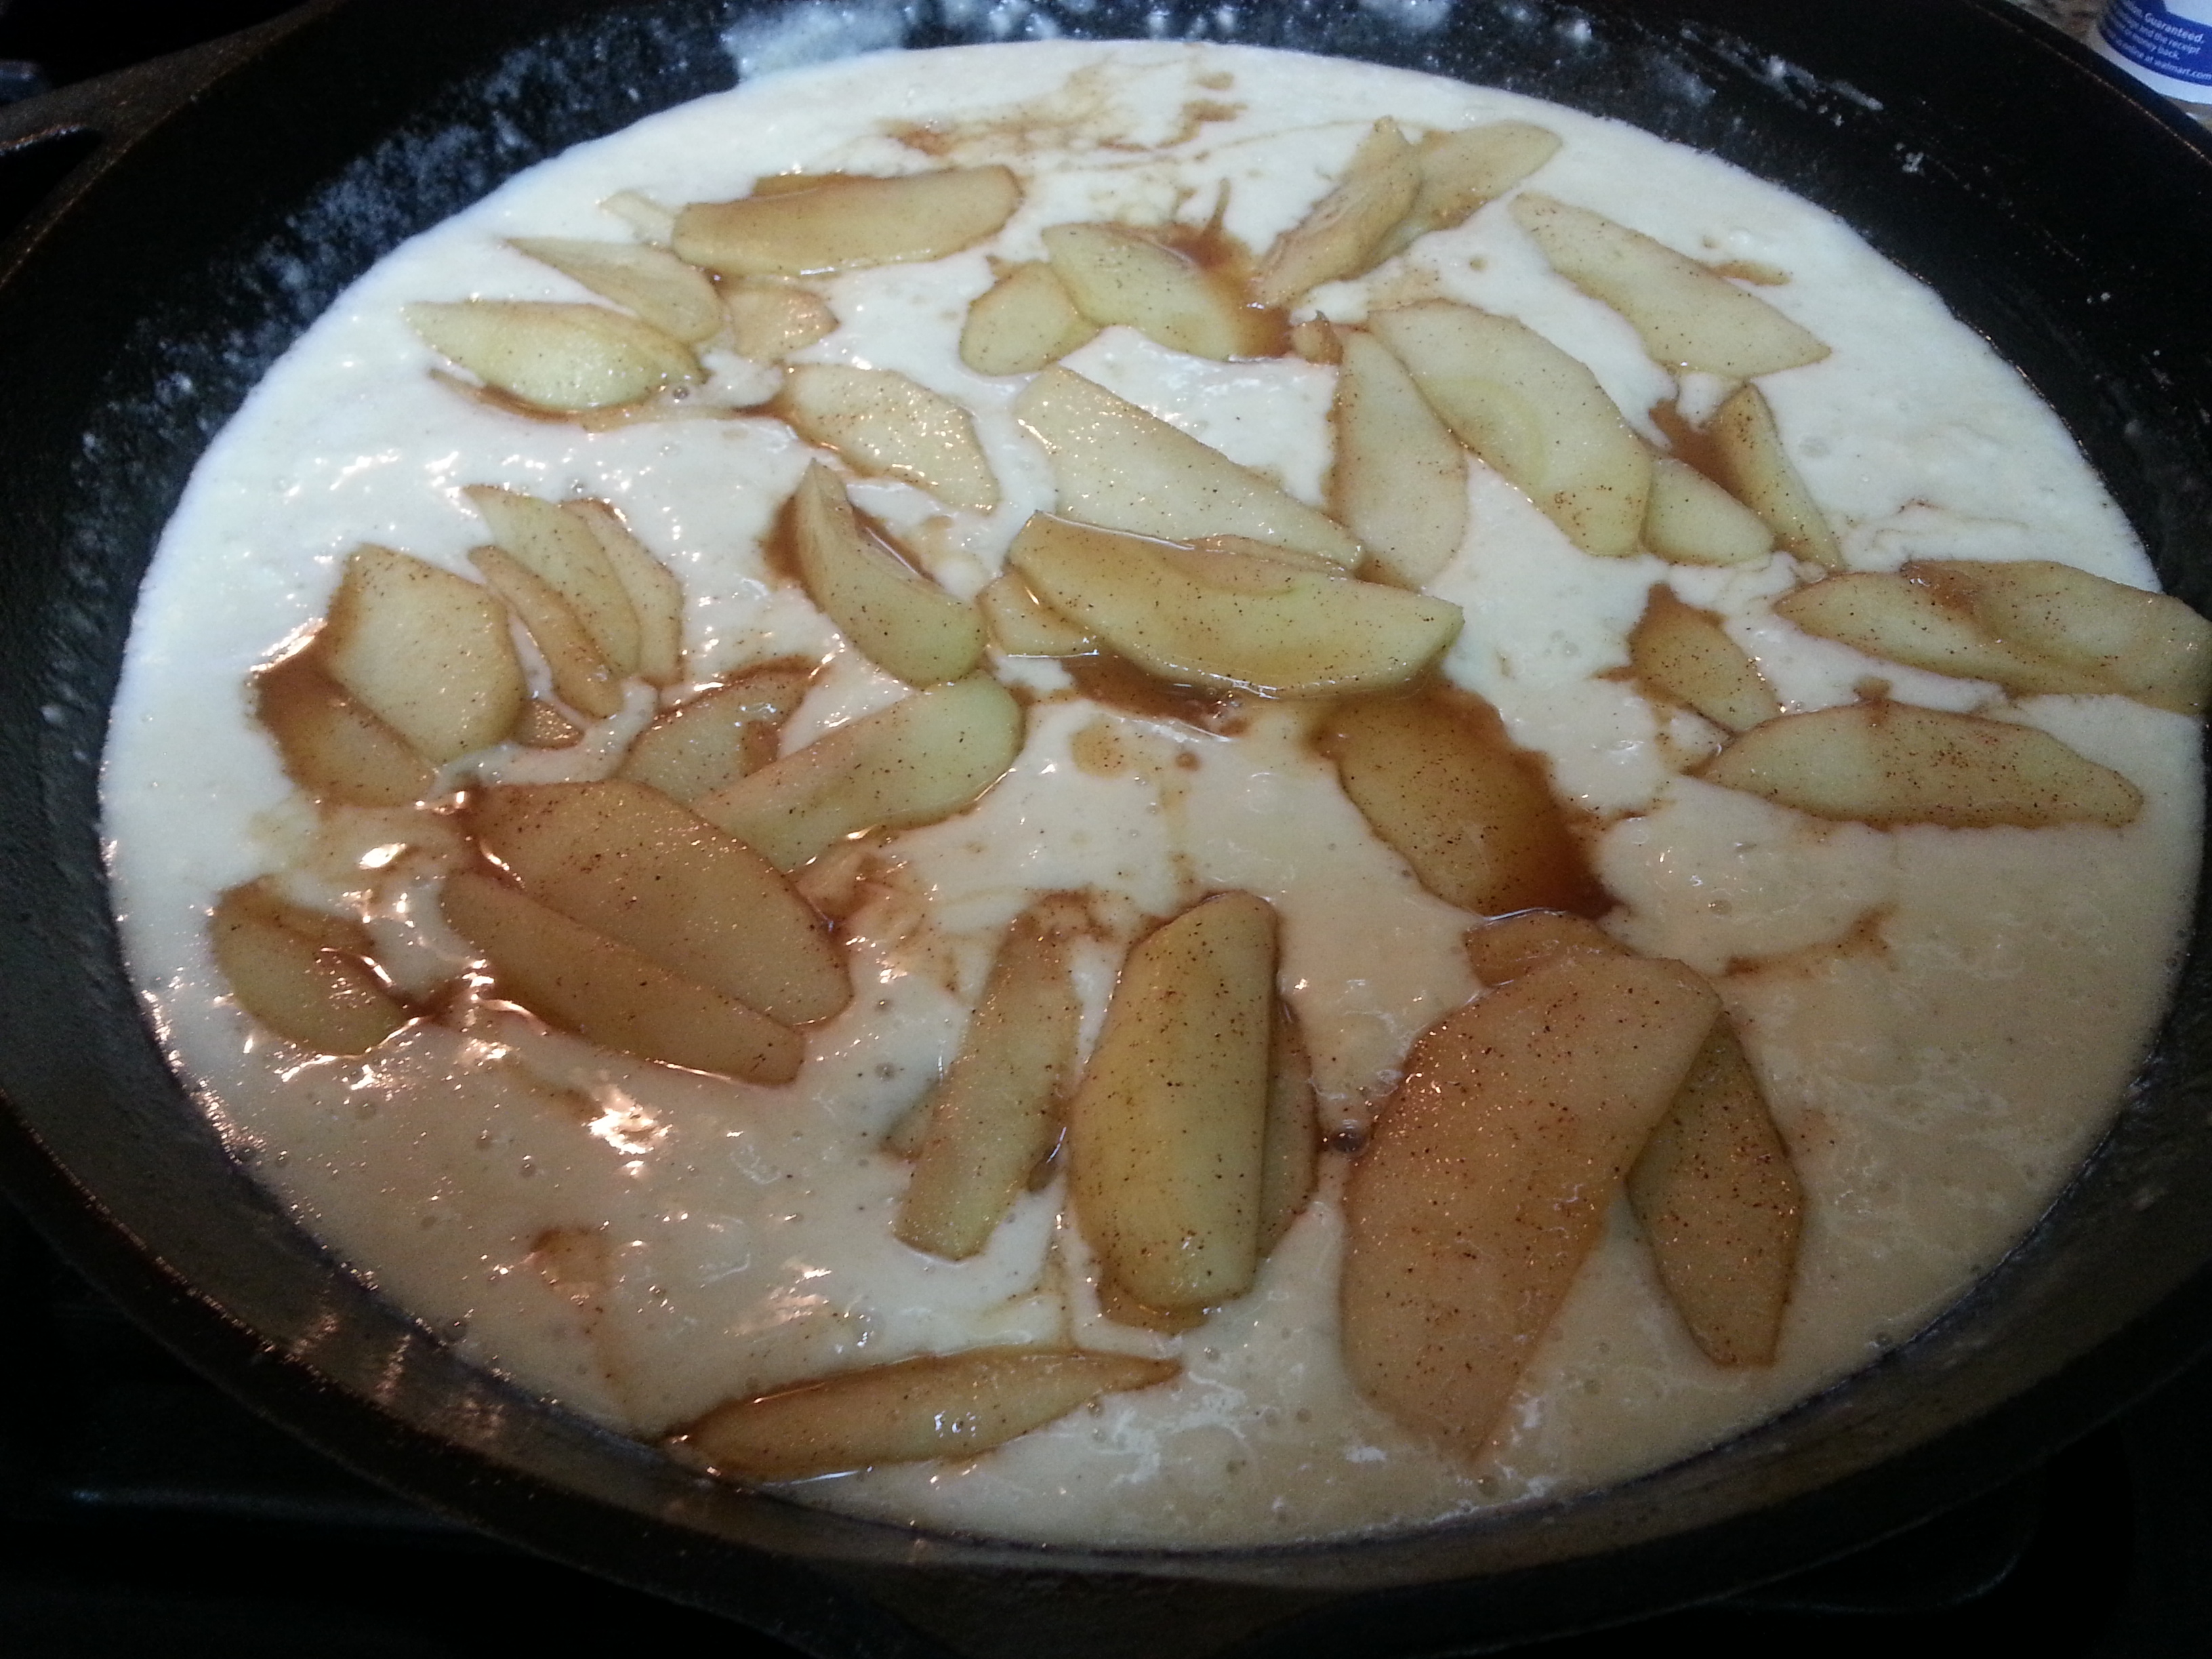
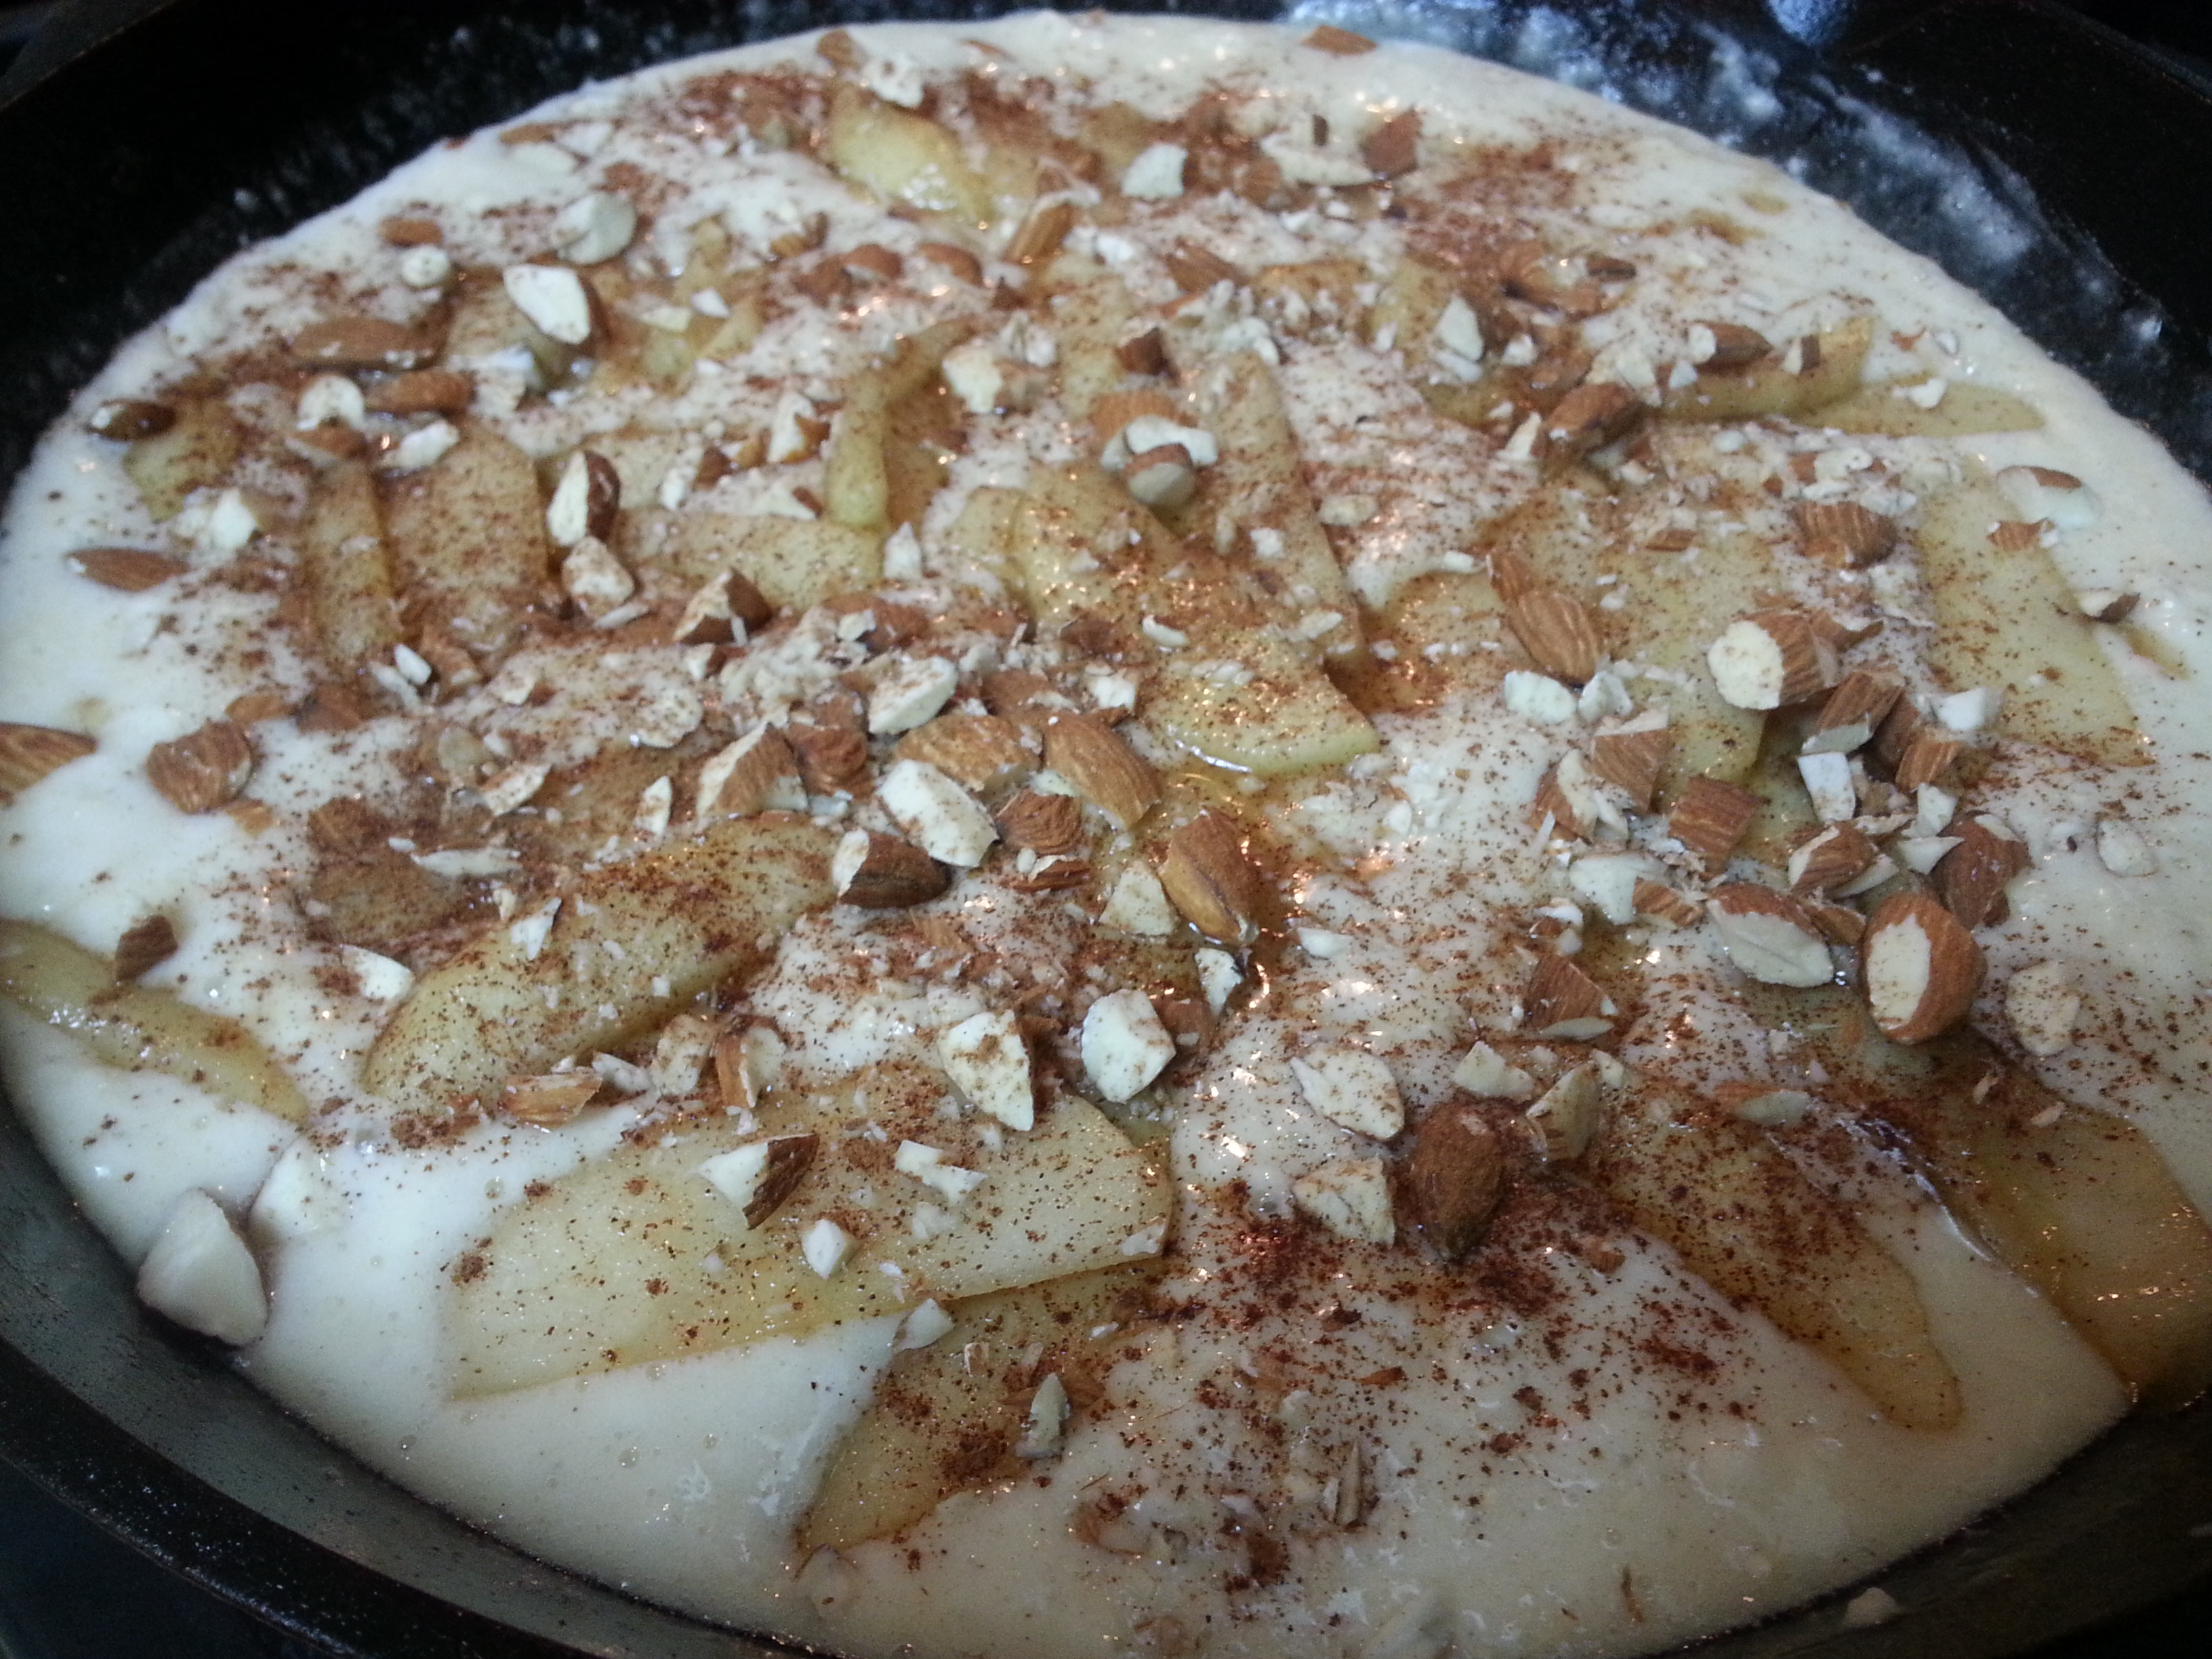
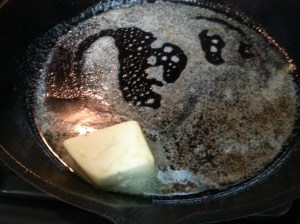
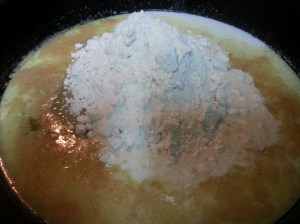
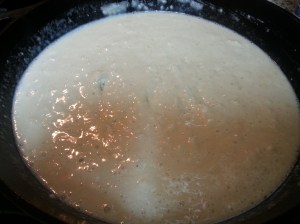
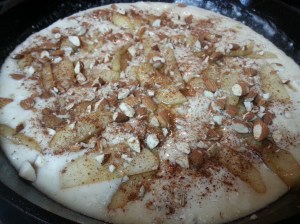
Add in the remaining 4 tbsp. butter. Reduce heat to low and let melt. Once melted, turn heat off and add in the sugar, milk and Bisquik. Stir together until combined, but leave slightly lumpy. Evenly spoon the apples from the bowl over the batter. Sprinkle with the nuts and then sprinkle with a little bit more cinnamon. Bake in the oven for 20 minutes.

Remove the skillet from the oven, making sure to use a pot holder or something on the handle since it will be HOT. Let cool and serve with your favorite vanilla bean ice cream.

cobbler 8cobbler 7cobbler 6cobbler 5cobbler 4cobbler 3cobbler 2cobblerWasn’t that easy? And your first bite will make you think….. apple pie alternative. cobbler 9

No Press? No Problem!

panini 10I’m not a gadget person but there’s some kitchen tools out there that are super helpful and should basically be a staple in your kitchen. By that I mean, a good blender, nice knives, a KitchenAid stand mixer (if you can afford it!). I didn’t get one of those until a couple of years ago and OMG why did I wait so long to get one?!?! Oh, wait, reference the prior statement in parentheses. They’re so damn expensive!!! But absolutely worth it!

Anyways, I’m not the type that needs a little tool for this and that. Give me a sharp knife and I can most likely do whatever that thing advertises. But there’s always that one kitchen item that you really want and just haven’t bought because it’s not a necessity. That for me has been a Panini press. I’ve had one of those things in an online cart too many times to remember, only to back out. First off, it really isn’t a need, it’s a want. Second, I have a pretty small kitchen with very little storage. My cabinets are FULL! So much so, that I’ve resorted to storing lots of kitchen stuff out in the garage cabinets.

So I’ve made due with what I have. And maybe you don’t even have what I use to make my “Faux-ninis” but I’ve got another suggestion that will absolutely work for you. Here goes…

Use a cast iron griddle pan! You know, the ones with the raised lines on them? Yep. That’s the one. You’ll get those cool lines on your fauxnini! But if you don’t have one, a regular cast iron will work or any type of pan, non stick preferred for this. But what about the press you ask? I’ve got that covered too.

panini 5See, all you need is another pan filled with a bunch of canned goods and voila, Panini without the “press”! You still get crunch and flat like goodness of a Panini. Without another tool taking up space in your kitchen.

Here’s the recipe for the type of Panini I made.

Caprese Panini

  • 2 tbsp. mayo
  • 2 tbsp. prepared pesto
  • 1/2 loaf of ciabatta bread
  • 2 slices pepperjack cheese
  • 1/4 c. shredded Italian blend cheese
  • 2 tomatoes, sliced

Heat your griddle pan over medium heat on your stove. Cast iron takes a little longer to heat up so while you assemble the sandwich is a good time to heat it up. Mix together the mayo and pesto to make a “pesto mayo”. Slice the loaf in half and spread the mayo on each side. On one side, lay the two slices of pepperjack. Add all the tomatoes to make sure it covers the loaf, then top with the shredded Italian blend. Place the other slice of bread on top. (Do as I say, not as I do in my pictures!) Place into a Panini press, or in my case, my fauxnini press. Place a pan filled with canned items to make it heavy and set on top of the Panini. Let cook for 3-5 minutes or until browned and crisp on one side. Remove the pan, flip the Panini over and place pan back on top. Let cook for about 2 minutes. Remove from heat and slice on the diagonal.

panini 9panini 8panini 7panini 3panini 2panini

Chocolate Chocolate Cookies

choco cookies 4As I’ve told you in the past, my baking skills are ehhhh….. Take for example the cake disaster of 2011. It was one of my daughter’s birthdays and I wanted her to have a beautiful cake with homemade fondant for her party. The previous year I’d made this delicious chocolate cake that my BFF had given me the recipe for and it turned out great. So I figured I’d make the same cake again and do some different decorations. Well, I followed the directions to a T. And it didn’t turn out right. It got stuck in the pan badly and just didn’t look right. I had to toss it. I persevered and made another one. Guess what? That one didn’t turn out right either! At this point, I was pissed which resulted in a lot of yelling/crying, my frustrations being taken out on a cake pan that I slammed repeatedly into the trashcan trying to get the cake out of it and my husband telling me to just go buy a cake. He’s always the voice of reason when I reach THAT point. And I was probably at like an 11, on a scale of 1-10! I didn’t listen to him though and I went ahead and made ANOTHER cake, but used an old standby and it turned out fine. Anyways, it’s incidents like that (and that wasn’t an isolated one!) that make me leery of baking.

BBBBUUUUTTTT, I’m getting better and taking on much smaller baking projects. Like, cookies! My hubs is usually the cookie baker in our house but (and I love him dearly!) his cookies are never consistent! They always taste good but they look different every time. So I’ve taken over the cookie duties lately and here’s the result of one of my baking experiments.

Although it’s a double chocolate cookie, it’s not overly sweet (which I’m not a fan of!) but has just enough choco goodness. And this is a great cookie base so if you want to switch out the chocolate chips for something else, that would work too. I’ve got some white chocolate chips in the pantry that are calling my name!

Chocolate Chocolate Cookies (makes 3 dozen cookies)

  • 1 3/4 c. white sugar
  • 2 sticks (1 cup) butter, softened
  • 2 eggs
  • 1 tsp. vanilla
  • 2 c. all purpose flour
  • 3/4 c. unsweetened cocoa powder
  • 1/2 tsp. salt
  • 1 tsp. baking soda
  • 1 2/3 c. mini chocolate chips

Preheat oven to 350 degrees. In a stand mixer, or a large bowl using a hand mixer, add in the butter and sugar. Beat for several minutes until combined and smooth. Add in the eggs and vanilla and mix together. Scrapes the sides in between mixings. In a separate bowl, combine the flour, cocoa, salt and baking soda and whisk together. Add half of this to the mixer and mix until combined. Then add in the rest of the dry ingredients. Add in the chocolate chips and mix once more just until combined. Using a cookie scooper, scoop the dough and place onto baking sheets. I usually do 12 cookies on 3 baking sheets. Place in the oven and bake for 8-9 minutes. The cookies will puff slightly. Remove from oven and let sit for about 3 minutes and then remove to a cooling rack. The cookies will flatten as they cool. Once completely cooled, place in an airtight container or a large Ziploc bag.

choco cookieschocolate cookies 2choco cookies 3Enjoy my fellow chocolate lovers!

Cold Leftovers Suck

thermos 2With cooler weather ahead, and it may have already cooled down for some of you, but still, we’ve experienced hot weather here. It’s finally cooling down a little but I’m just waiting for Mother Nature to say PSYCH! and out comes the 85 degree weather again. In November…. Anyways, as I was saying, with cooler weather, a nice hot lunch hits the spot! Especially for the kids who have to eat outside at school. Here, there is no cafeteria for the kids to sit in. Nope, they sit outside on benches and the only time they eat inside is when it’s exceptionally hot out, or raining. On those colder days, I like to send my kids leftovers in their thermos. Soup, spaghetti, macaroni and cheese, I’ve even sent teriyaki chicken and rice. And they are always so excited when they get to take their thermos to school!

When my oldest first started taking her thermos, she’d come home and tell me the food was not very warm. Hmmm… there went the happy thought that she was able to have a hot, homemade lunch. So a little trial and error came up with this tip to keep your thermos lunch nice and hot until lunchtime….

Let your kitchen sink water run on HOT for a few minutes. Until it’s super hot. Then fill up your thermos with the hot water, put the lid on and let sit for about 10-15 minutes. Heat up your leftovers in the microwave until they are also very hot. Dump out the water, add in the hot food and quickly screw on the lid. There you go. Hot leftovers for whatever time your kids take lunch. And my oldest doesn’t have lunch until 1:00 this year, so that’s awhile to sit in the thermos. But she swears it’s nice and hot by the time she eats.

thermosthermos 3And don’t think thermos lunches are only for kids at school. I used to send my husband leftovers for his lunch when he was a truck driver. He was so busy he barely had time to eat so opening up that thermos and having a homemade, hot lunch was a lifesaver for him.

But really, any way you put it, kids or adults, cold leftovers suck. Not a problem anymore though. At least not in a thermos.

Spaghetti Sauce

spaghetti sauce 4OK, so yes, technically, I didn’t use actual spaghetti pasta when I made/photographed this. But, it’s a red, tomato based meat sauce that goes on top of noodles which in my opinion, equals spaghetti sauce. Call it what you want, I call it yummy.

The key to this sauce is letting it simmer and cook down. This is what I think is the spaghetti secret. For those of you who’ve had spaghetti where the sauce is a bit watery and leaching out liquid all over the plate, well, that’s no good. But if you let the sauce cook longer, the flavors develop MORE and the end result is a thicker, heartier sauce that doesn’t taste like liquid tomato. Sad to say, but I’ve actually eaten at restaurants that serve their spaghetti just like that! And I’m sure you have too.

Even though you need to let this simmer, this recipe for me is just about the easiest thing you can make. And a good spaghetti recipe is something everyone needs to know. So for you new cooks just starting out (or seasoned veterans), this one’s a keeper!

Spaghetti Sauce

  • 1 lb. Italian sausage, bulk (or 1/2 pound each of ground pork & ground beef)
  • 1/2 onion, chopped
  • 1/2 green bell pepper, chopped
  • 8 ounces crimini mushrooms, sliced (that’s a whole package)
  • 2 garlic cloves, minced
  • 1/2 c. red or white wine (whatever you have on hand that’s open)
  • 28 ounce can of crushed tomatoes
  • 15 ounce can of diced tomatoes
  • 1/4 c. grated parmesan cheese
  • 1/8 tsp. salt (if using ground pork & ground beef) OR 1/4 tsp. salt (if using Italian sausage)
  • 1/2 tsp. pepper
  • 1 tsp. Italian seasoning

In a large pot or Dutch oven, heat over medium. Once hot, add in the Italian sausage. Cook until almost fully browned, stirring occasionally and add in the onion and bell pepper. Stir together and let cook for about 3-4 minutes. Add in the mushrooms and garlic. Cook for 1 more minute. Then add in the wine. Stir, making sure to scrape up any bits stuck to the bottom of the pot. Let cook for 1-2 minutes or until wine has slightly reduced. Then add in both cans of tomatoes and seasonings. Once sauce starts bubbling, add in the parmesan cheese and stir together until it has melted. Reduce heat to a simmer and leave uncovered on the stovetop for approximately 1 1/2-2 hours, or until it has reduced and reached a thicker sauce stage. Serve over spaghetti or your favorite pasta.

spaghetti sauce 3spaghetti saucespaghetti sauce 2spaghetti sauce 5*This also freezes exceptionally well! So once it’s cooled, you can pop it into a plastic freezer container (even a gallon sized Ziploc freezer bag works great, but make sure to lay flat on top of something) and place in the freezer. I heart having this type of stuff already made and waiting for me in the freezer on those hectic days.

Wine Time

wine 2If you’ve ever read my “about me” on here or know me personally, then you know my drink of choice is wine. White in particular. Not that I hit the bottle hard or anything, but when I do occasionally imbibe, my poison is wine. Anyhow, I came across some information at my local grocery store about wine pairings and I thought it was too interesting not to pass on.

I don’t typically do wine pairings. Ever. So don’t go thinking I’m a wine connoisseur or anything like that. I’m more the drink it while I’m making dinner, feel good, THEN eat type of person.  But for those of you out there that enjoy a glass of wine with dinner but aren’t quite sure what matches up to what, here’s a little guide:

White Wines:

  • Chardonnay-Dry. Medium to heavy body. Typically with oak. Pairs well with: mild cheese, salmon, scallops, chicken, baked ham, cheesecake
  • Sauvignon Blanc– Dry. Light to medium body. Clean and refreshing. Pairs well with: oysters, shrimp, lobster, chicken, key lime pie
  • Pinot Grigio– Medium body. Crispy and dry. Pairs wells with: white sauces, grilled chicken, lobster, shrimp, pork, apple tart
  • Riesling– Sweet. Light body. Pairs well with: creamy cheeses, spicy dishes, baked ham, grilled pork, melon
  • Moscato– Sweet. Light body. Pairs well with: oysters, shrimp, spicy dishes, peach cobbler, sorbet
  • Sparkling– Light and bubbly. Pairs well with: nutty cheeses, oysters, clams, crab, spicy food, milk chocolate

Red Wines:

  • Cabernet Sauvignon– Dry. Heavy body. Pairs well with: pungent cheeses, grilled steak, roasted lamb, red sauces, dark & bittersweet chocolate
  • Malbec– Dry. Heavy body. Pairs well with: smoked turkey, carne asada, pulled pork, dark & bittersweet chocolate
  • Zinfandel– Dry. Medium to heavy body. Pairs well with: aged cheeses, spare ribs, brisket, leg of lamb, pizza, chili, beef stew, chocolate cake
  • Merlot– Dry. Medium body. Pairs well with: aged cheeses, veal, meatloaf, hamburgers, salmon, red sauces, chocolate mousse
  • Pinot Noir- Dry. Medium body. Pairs well with: cream cheeses, roasted pork, smoked sausage, salmon, crème brulee
  • Red Blend– Off-dry. Medium body. Pairs well with: risotto, lamb chops, grilled steak, hamburgers, cherry pie

My personal favorite is Chardonnay. It’s dry, not sweet, slightly bold. And I’m more than happy to drink a $4.99 bottle of Barefoot Chardonnay. They’re award winners for a reason! However, if I’m out wine tasting locally, I prefer a Viognier which in my opinion, is a lighter more refreshing sister to Chardonnay.

If I’m drinking red at home (which I typically don’t, but my hubs only drinks red wine) I’m more than happy with a Red Blend. They are typically smooth, not overpowering and a great intro to red wines. Menage A Trois makes a great inexpensive one (around $7.99). Thanks to my neighbor for introducing me to that one! Wine tasting locally, I love Zinfandel! It’s smooth and flavorful. And nothing at all like the box of that pink stuff you may be thinking of.

So with the holidays coming up and armed with this new wine knowledge, I’m thinking about being a little sophisticated and having a wine tasting party. Everyone brings their favorite bottle of wine. Tastings and appetizers, that I now know will pair well together! Sounds like a nice little change from the traditional get together.

Or I might just continue to drink my cheap affordable wine, enjoy my pre-dinner buzz, go about my evening, and forgo the hassles of hosting company at my house. We’ll see how things go.