Hanky Planky

dc holder 3I’m going to do a little self promotion right here and now! My husband and I JUST opened an Etsy shop. Yay! OK, I really haven’t been jumping up and down for joy because Etsy is not nearly as user friendly as Ebay, I must say. So this has been quite the learning experience for me.

jh coffee 5
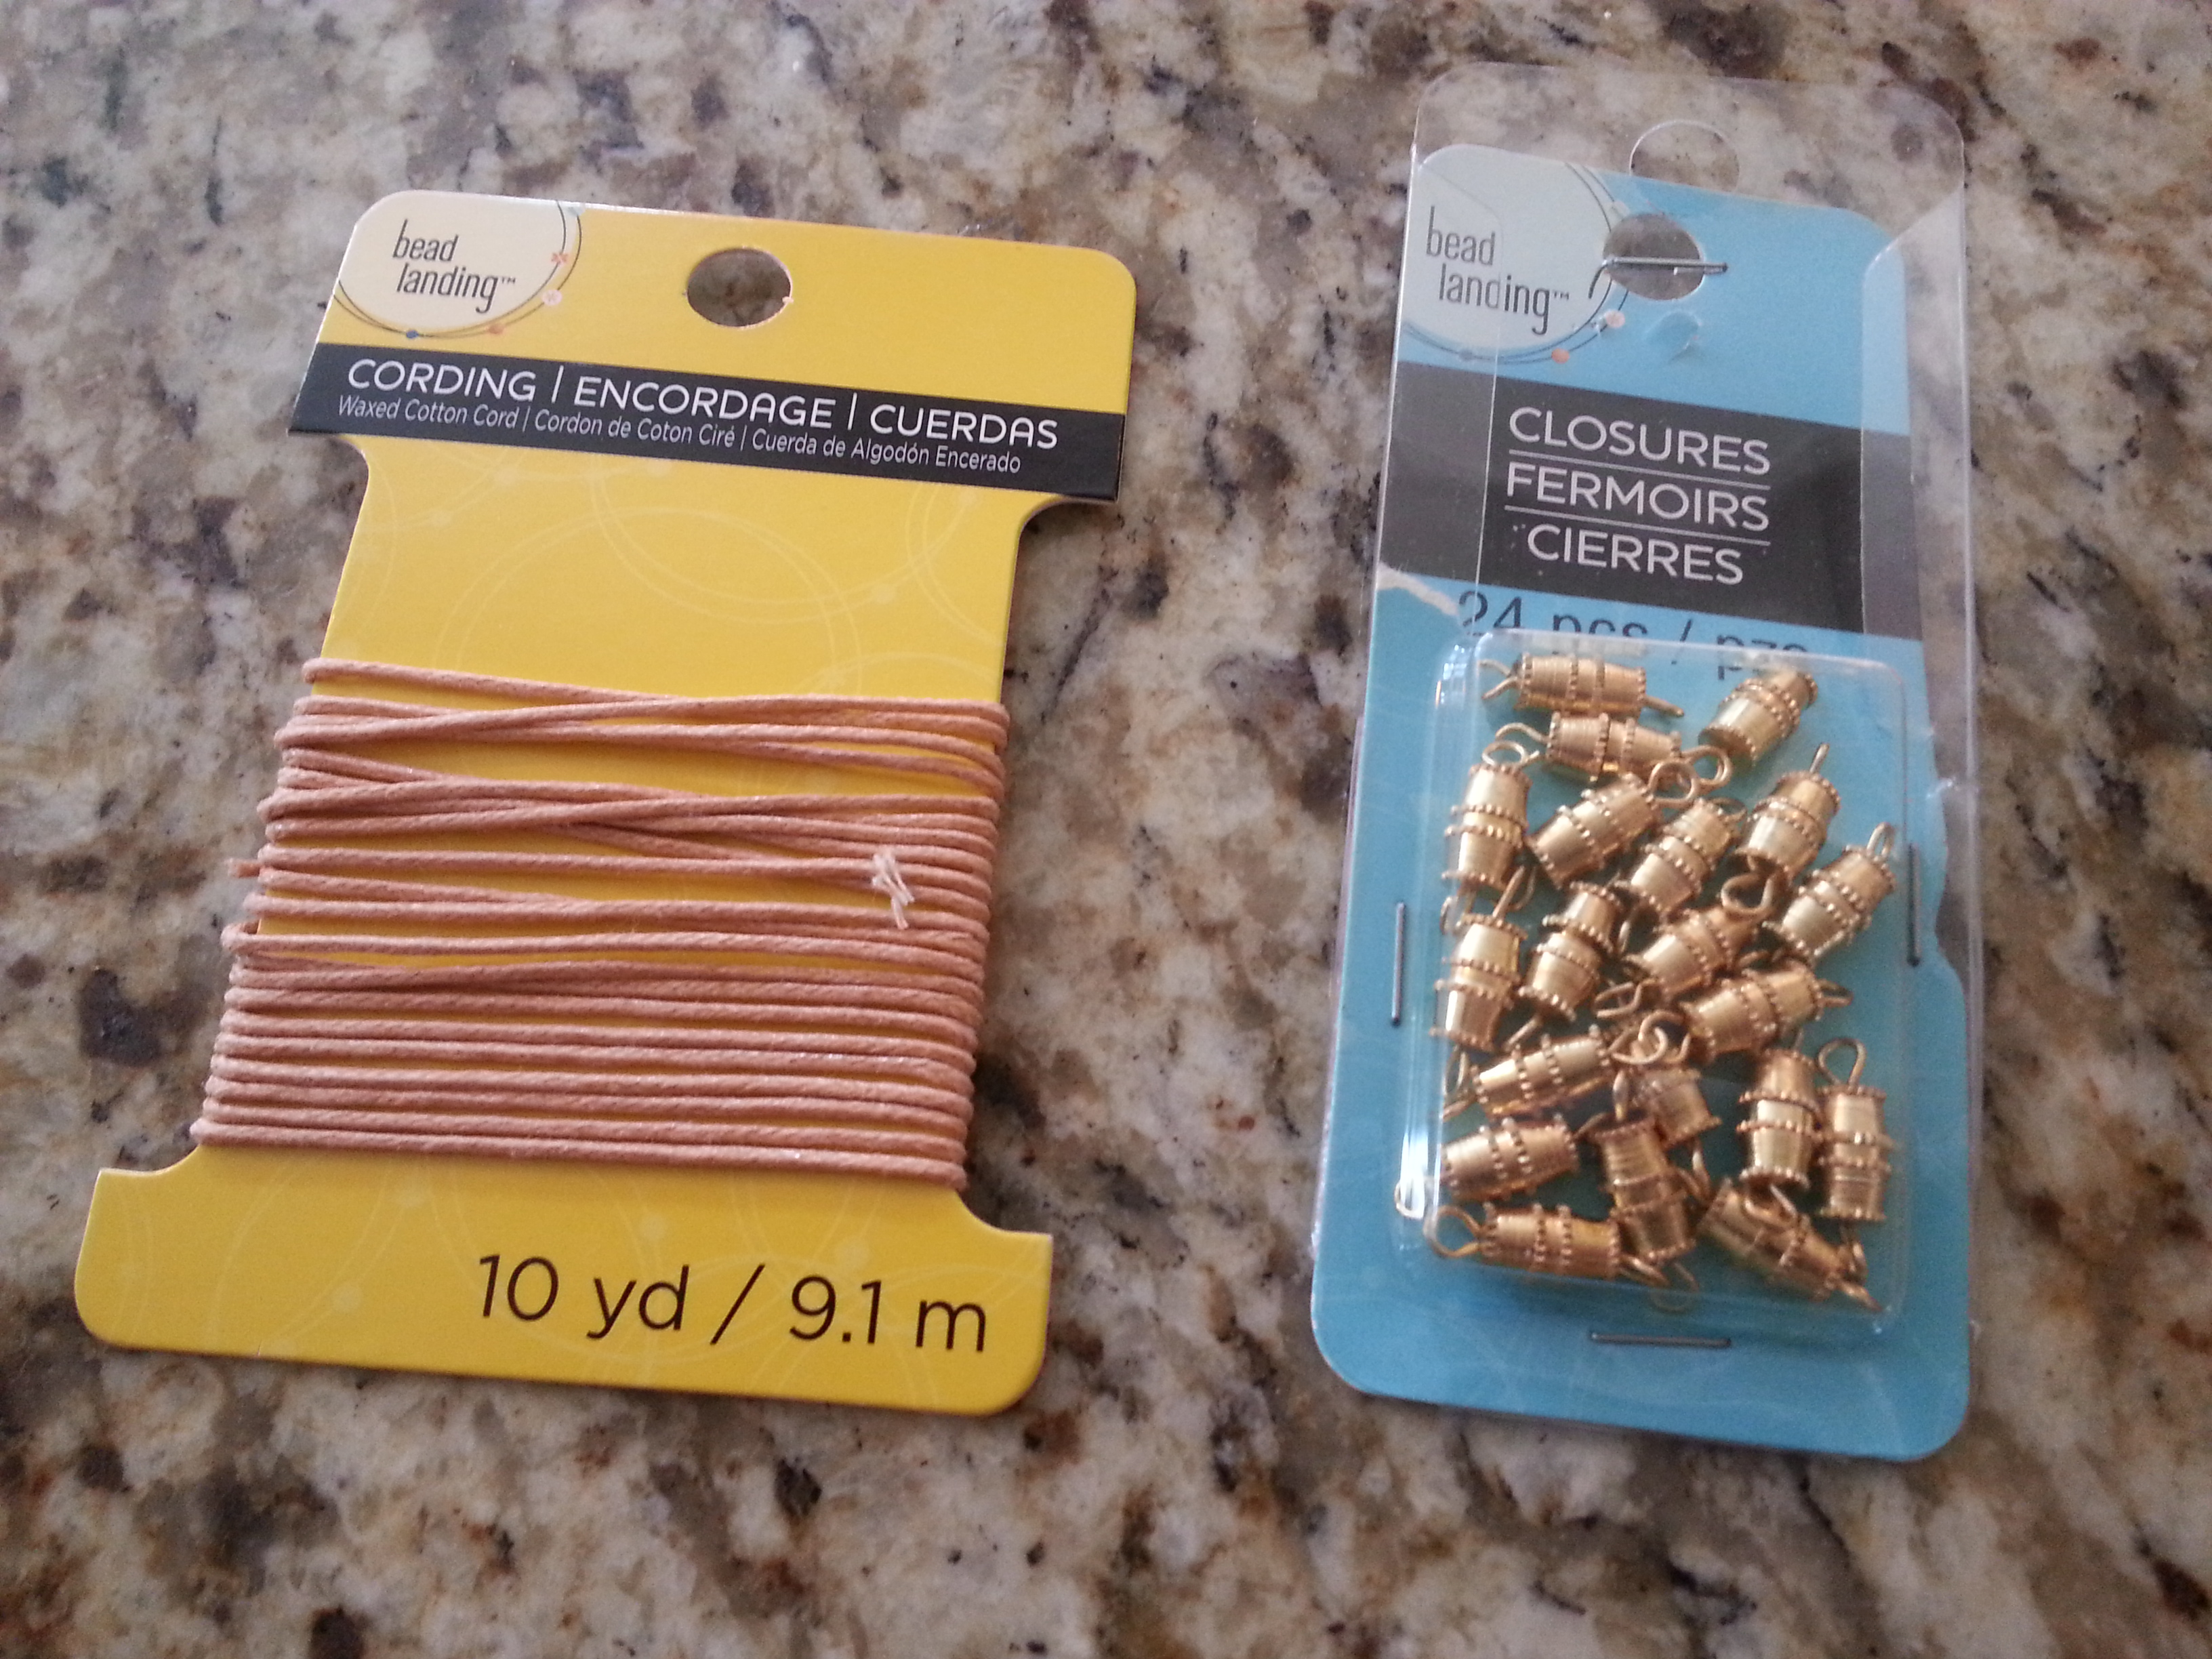
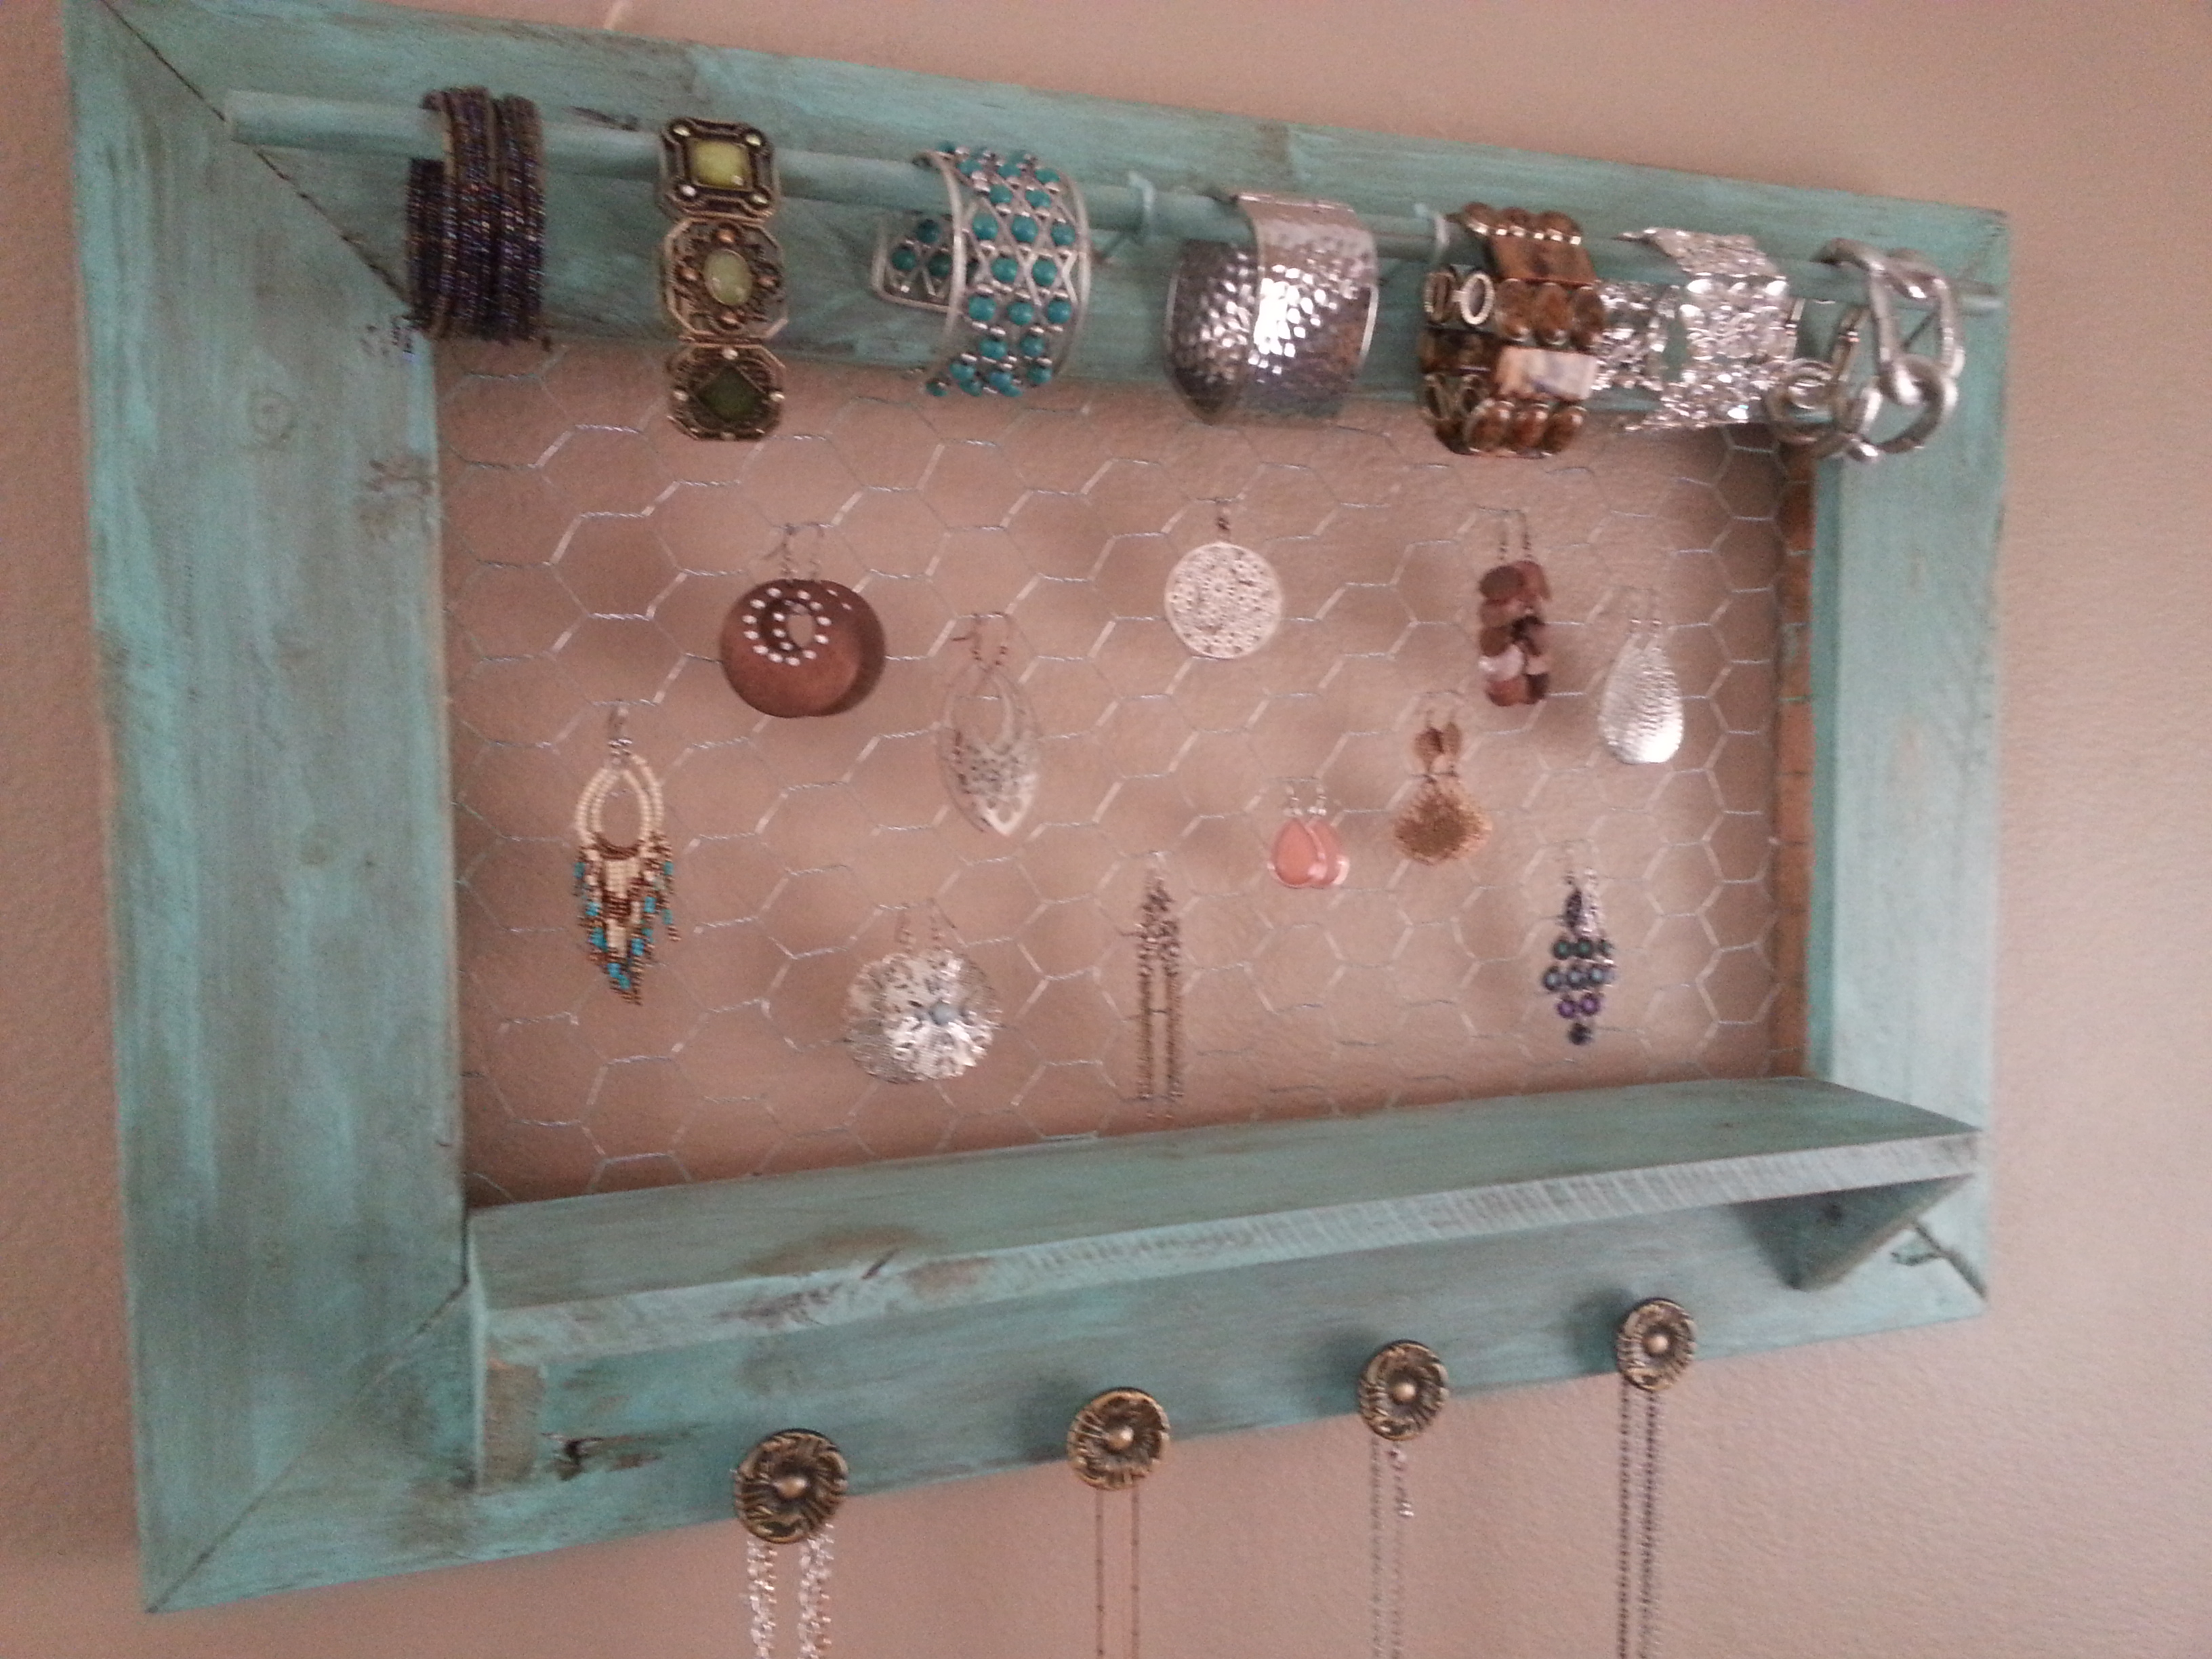
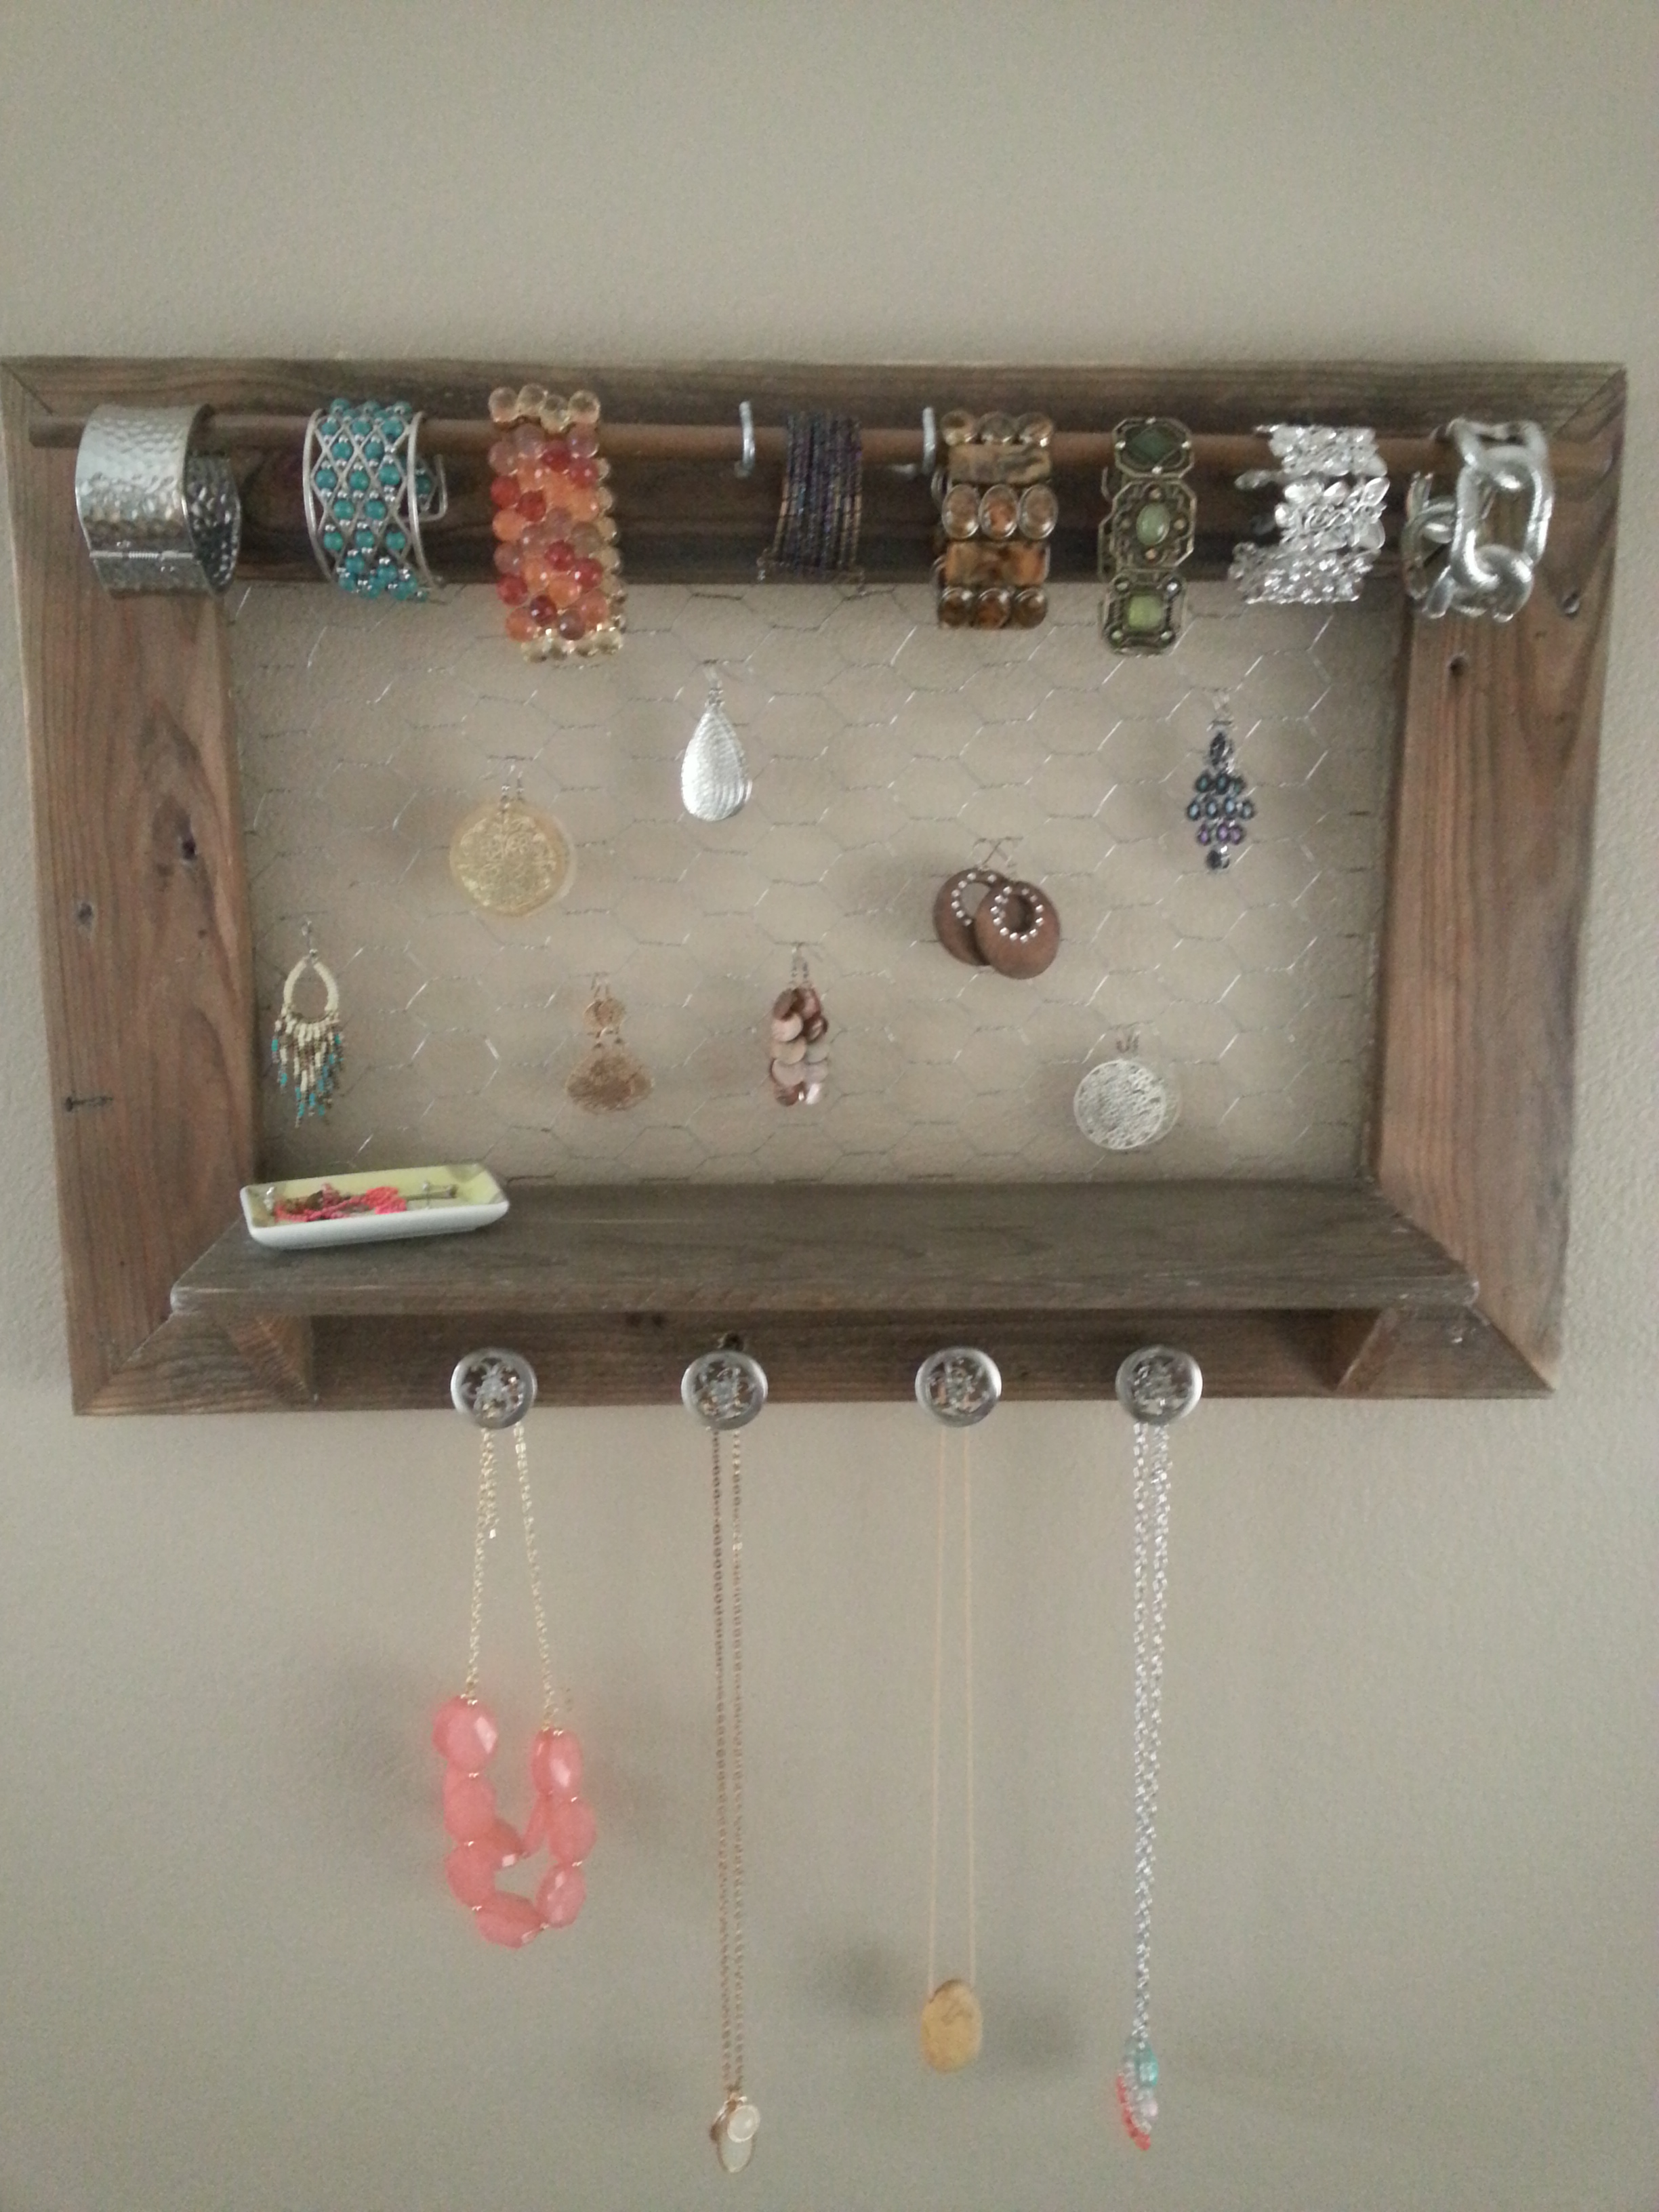
Our little shop is obviously just starting off, so right now we’re just selling jewelry holders. These aren’t just any jewelry holders, but rustic, upcycled pallet jewelry holders. And that’s our style! Rustic with a vintage feel, specifically using pallets to create something “new” out of something “old”. And these jewelry holders are super pretty and functional too. Read our “about” over there on Etsy and see how this little business came to be. My husband is just a building fool nowadays and has been creating all kinds of things. One of my favorite, and I’m not exaggerating when I say FAVORITE, things he’s built is this coffee cart. I absolutely love it.

coffee cart 2coffee cart
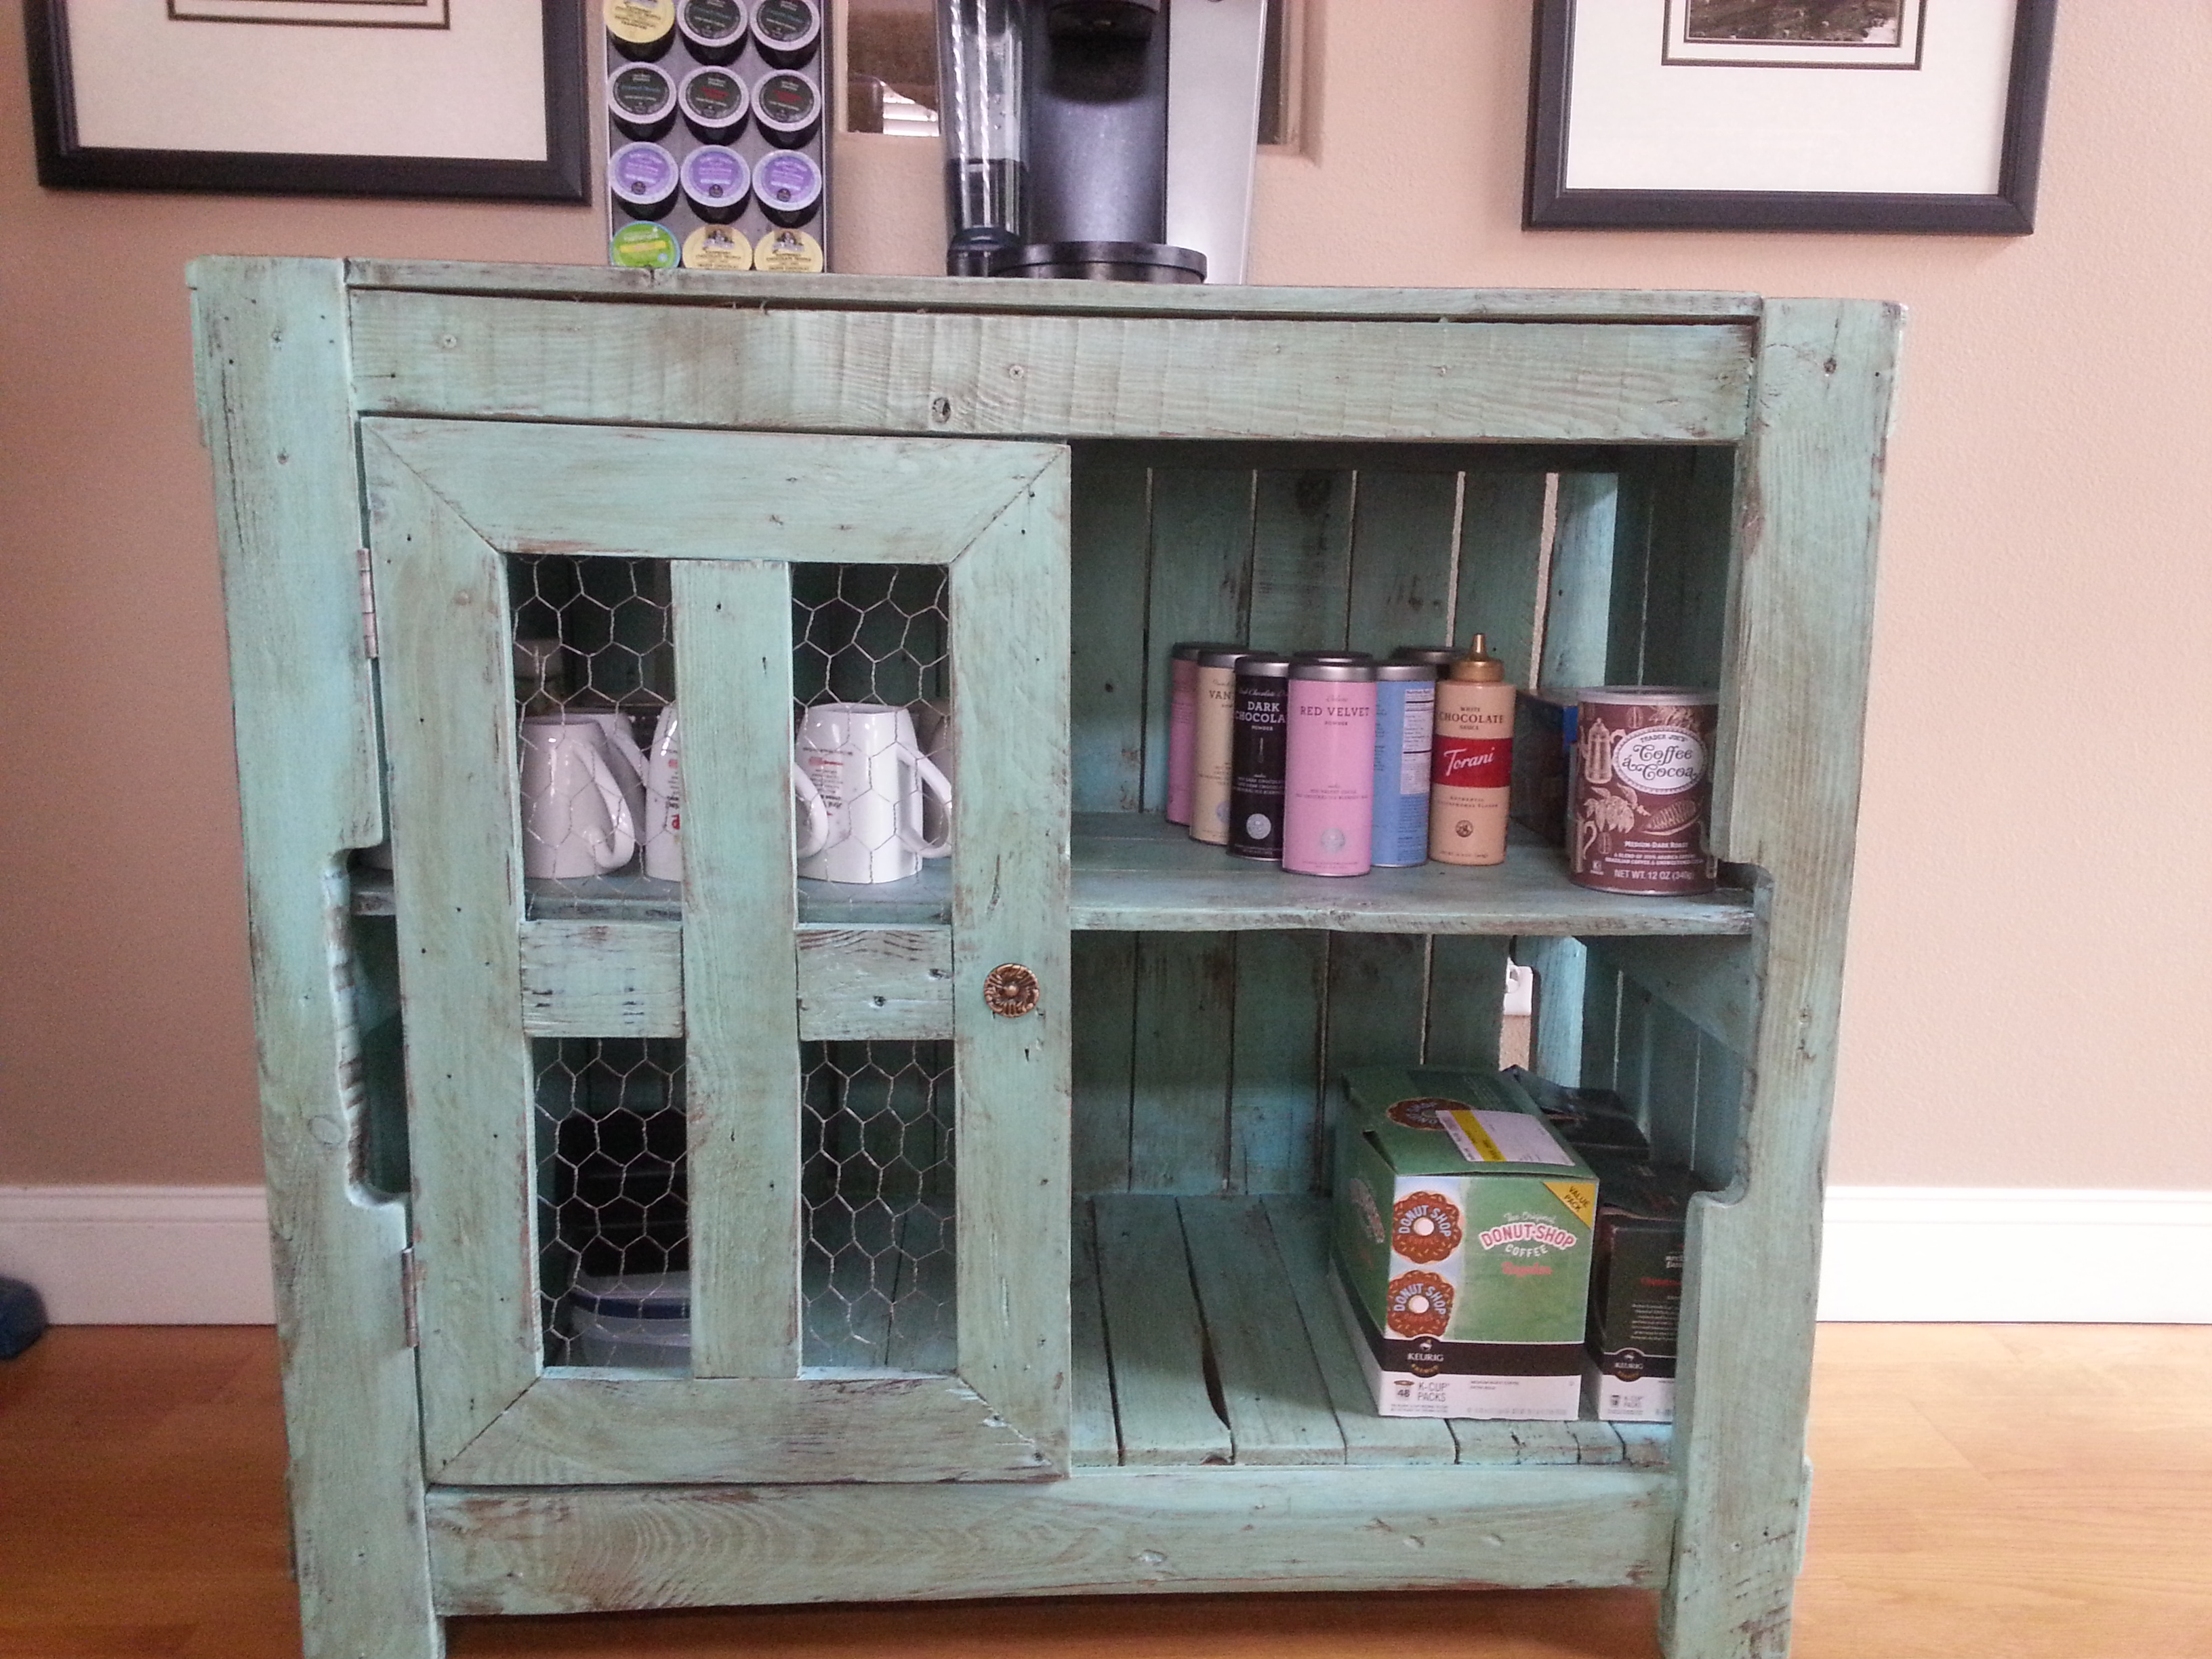
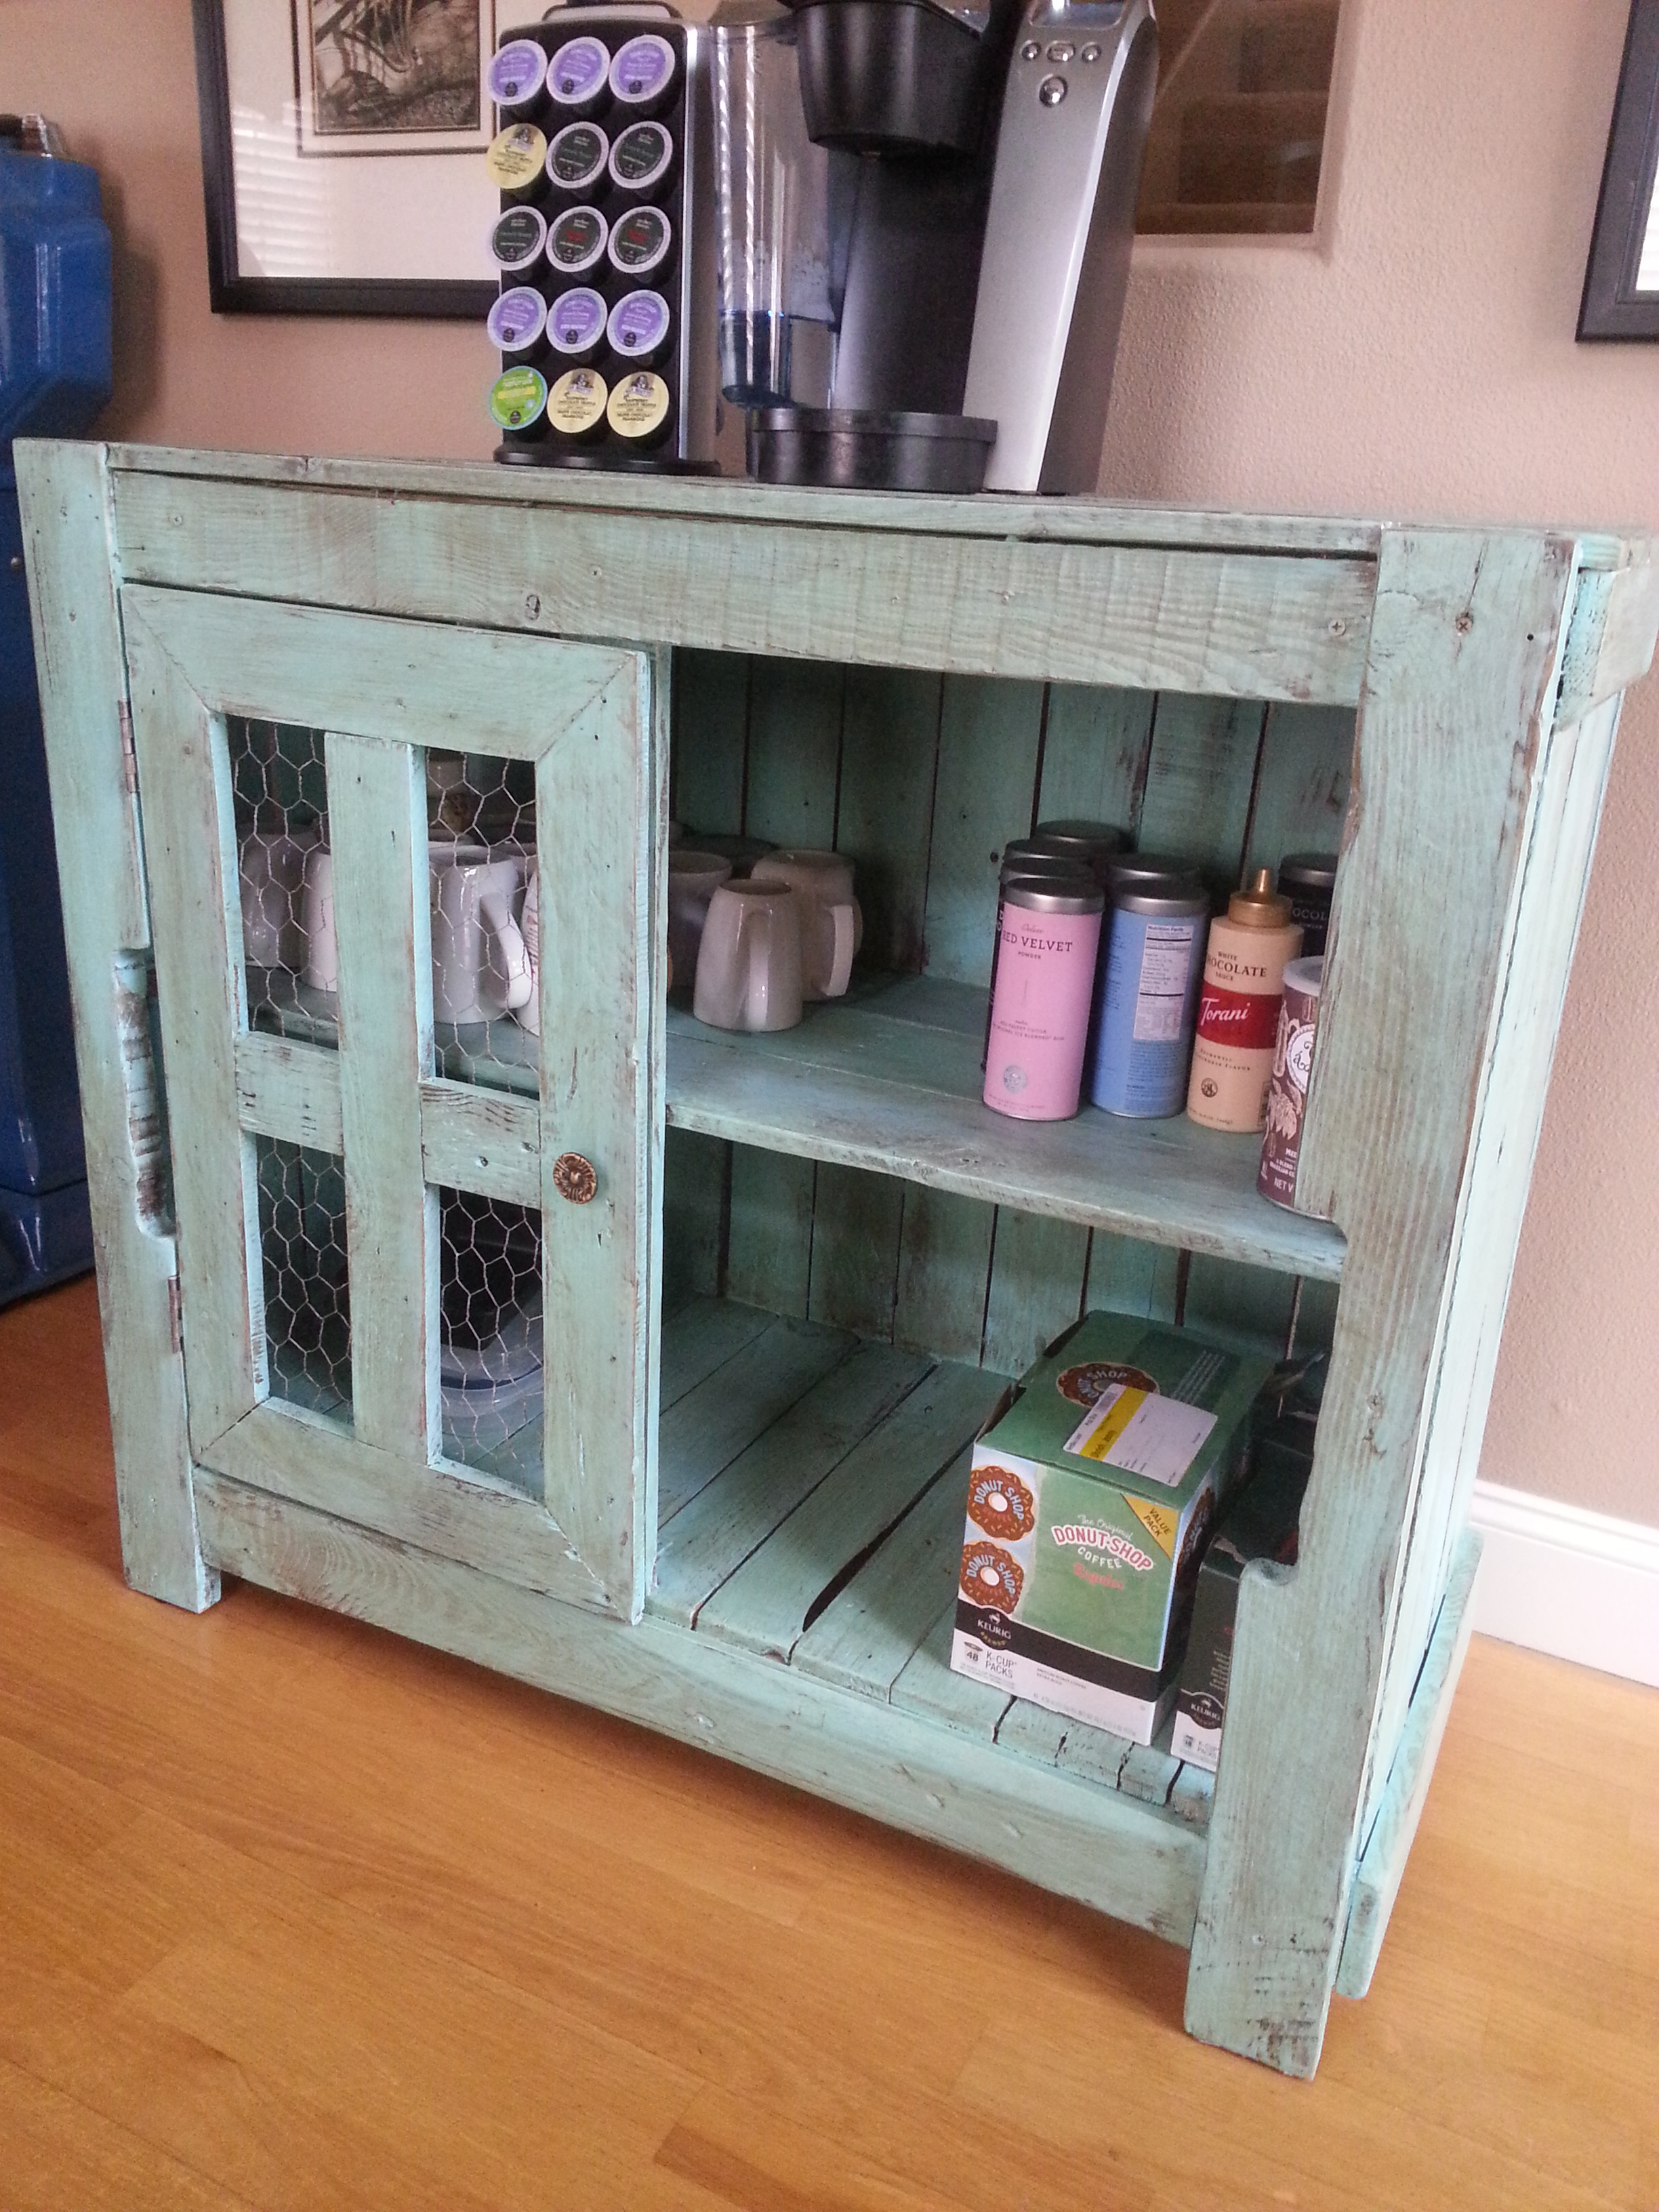
He built this for me for Christmas and not only is it exactly what I wanted, but it’s like a piece of art sitting in my living room. I wanted something that looked very old and like it came from a farmhouse and it’s unbelievable how well it turned out. If you were to see this thing in person, you wouldn’t believe it’s “new”. We’ve gotten quite the compliments on this little beaut so we’re hoping to sell these in the near future.

So come check out Hanky Planky. <———– Click! Click! Click! Where Old Wood Rises Again……. Get it? I hope so!

Advertisement

DIY Pendant Necklace

necklaceI’m not the “craftiest” of people, unfortunately. I hate messes therefore, I don’t like most crafts. Glitter makes me shudder. But a couple months back over Thanksgiving break, I really wanted to do something fun (and not messy) with my kids. I had seen polymer clay jewelry on Pinterest for awhile and since I love jewelry (and so do my little girlies), I decided to give it a try.

We headed over to Michaels armed with my good ol’ 40% off coupon. And I stocked up on clay! Since this was my first time using polymer clay, I bought a variety pack with a bunch of different colors and spent about $15 total on the jewelry making supplies. And I have a bunch leftover and we’ve since made quite a bit of pieces.

Am I now an expert jewelry maker? God, no! But, I’ve made some pieces since our first initial try that have turned out pretty good. My kids love their jewelry and not only did they get to be “crafty”, but they can actually wear/use what they made. All my kids are in elementary school and were completely capable of doing this. We started out simple that day and just rolled out balls and made necklaces. But what I really wanted was a stone looking pendant necklace. I’d been eyeing one on a website that I really wanted but with my new stock of clay, I figured it was worth a try. And here’s how I made it.

necklace 2Supplies Needed:

  • Polymer clay, in any color/colors you choose
  • Waxed cotton cording
  • Necklace clasp (if you plan on having a shorter length necklace)
  • A toothpick
  1. Choose your color or colors. For the above necklace, I chose a bronze and silvery color clay.
  2. Grab a piece of each color. I did less of the silvery color because I wanted it to be streaky looking like a natural stone. Hold in your hands to condition (warm up to make more pliable) the clay.
  3. Roll into balls.
  4. Smoosh the balls together, working them into one ball.
  5. In between your hands, roll the ball back and forth until it turns into a longer, ovalish shape.
  6. Press between your hands into a pendant like shape, smoothing out any fingerprints.
  7. With the toothpick, push it through the top to create a hole to put the cording through.
  8. Place on a baking sheet (I use a disposable lasagna pan) in a 325 degree oven for 20 minutes. (I used another sheet on top to cover it).
  9. Remove from oven and let cool for about 15-20 minutes.
  10. Measure out your cord and put the pendant on it. Tie cord into a knot if doing a long necklace, or attach a necklace clasp to each end if doing a shorter necklace.

necklace 11necklace 10necklace 9necklace 7necklace 6necklace 5necklace 4necklace 3necklace 8My oldest daughter and I did this together because she wanted a pendant necklace as well. She also was making birthday presents for some friends and made them some really pretty necklaces which they loved.

This stuff is really easy to work with and pretty inexpensive. I bought the cheapest clay at the store and am really happy with it. So even if aren’t the “craftiest” (like me!) this is still a fun activity to do alone, or with your kids.

Jalapeno Cream Sauce

jc sauce 7One of my favorite restaurants here in town serves this delicious pan fried chicken breast with a jalapeno cream sauce over the top. I order it every time we go there because it’s simply delicious and I just love the sauce. Well, as I’ve talked about before, eating out is SO incredibly expensive and unfortunately, this is a $20 dish at this place so make it at home I must!

Luckily for me (and my family), my experiment turned out pretty well because although I really like that restaurant, I haven’t been back since I concocted my own sauce. And recently, I was talking to a friend about this very restaurant and she mentioned her husband loves the sauce as well. We scheduled a day for her to come over and we cooked this dish right up in my kitchen and she agreed! The sauce tastes very similar to what you get at the restaurant. And it’s so incredibly easy, yet looks like you spent way more time on it.

Jalapeno Cream Sauce

  • 1 tbsp. butter
  • 1/3 c. pickled jalapenos, chopped (these can be found on the pickle aisle)
  • 1/4 c. sun dried tomatoes, chopped
  • 2 garlic cloves
  • 2 c. half & half
  • 1 heaping tbsp. flour
  • White pepper, cayenne, salt to taste

In a skillet or saucepan, heat over medium heat. Add butter and let melt. Add in the jalapenos and sun dried tomatoes and let cook for a couple of minutes, until warmed through. While that’s cooking, in a measuring cup, add the half & half and the flour. Use a whisk to combine and stir until smooth. This is the slurry that will thicken the sauce. Add in the garlic to the pan and let sauté about 30 seconds. Reduce heat to low and add in the slurry. Bring heat back up to medium, and whisk. As it comes up to a bubble, it will thicken. Add in the seasonings a little at a time, tasting as you go. Reduce heat to low until ready to serve.  *White pepper and cayenne are very strong flavors so start off lightly.

jc saucejc sauce 2jc sauce 3jc sauce 4jc sauce 5jc sauce 6Once the sauce has thickened and is seasoned to your liking, pour over whatever you like! I love this on a panko coated pan fried chicken. I’ve also served it with shrimp and pasta and it went very well together. The restaurant that I got the idea from, uses it as a dipping sauce for calamari as well.

jc sauce 8And surprisingly, my kids really like this sauce. I just make sure to put it on the side and they dip their chicken in it. Family friendly!

“Fried” Drumsticks

Well, so much for winter. After our New Year’s Eve snow, (which actually hung around for a few days in the shady spots of our yard and the neighbor’s) the weather forecast has shown that it will be in the 80’s tomorrow. THIS is one of my gripes about living in Southern California. It just shouldn’t be 80 in January, a week after it snowed. It’s absolutely ridiculous. I just refuse to wear shorts in January! Anyways, now that I’ve gotten that complaint out of my system, onto the food. January means it should be cold, and cold weather means comfort food. So there.

I made these “fried” drumsticks awhile back and this is the way to make them. Although I love traditional fried chicken (your U.S. citizenship is taken away if you don’t), this is easier and makes for quicker cleanup. And you can completely customize this to suit your tastes. You just need to know the method to do it.

“Fried” Drumsticks

  • 8-10 drumsticks
  • 1 cup flour
  • Seasonings of your choice (I used paprika, garlic powder, onion powder, salt & pepper)
  • Cooking spray

Preheat your oven to 375 degrees. In a large bowl, add flour and generously sprinkle the seasonings of your choice into the bowl as well. Stir to combine. Dredge the drumsticks in the flour mixture and place on a baking sheet that’s been sprayed with cooking spray. Once all the drumsticks have been dredged, completely spray them with cooking spray. Place in the oven and cook for 35-40 minutes. You can tell they’re done when the meat starts pulling away from the bone.

fried chicken 3fried chickenfried chicken 2And there you have it! These drumsticks come out with a crunchy skin and are moist and flavorful. Like I said, customize it to suit your tastes and use what seasonings you like.

Even though winter seems to have come and gone (please come back), you can’t take comfort food from me!

It’s a New Year

13332015….. how did that happen?!?! For me, every year feels like it passes so much faster than the last. And this year came and went so quickly. So how did we end 2014?

Well, on New Year’s Eve, I was woken up at 3:30 am to an extremely excited, giant man child telling me that it was snowing outside. I’ve lived in So Cal for the last 25 years and have only seen it snow ONCE, and it barely stuck to the ground. So my grumpy self got up and looked out the window and saw, yes a little bit of snow. I got back in bed only for Adam (aka giant man child) to come back in 10 minutes later and tell me to look again. And it was snowing, like really snowing out. Fast forward to 5am and I’m woken up by my house phone ringing and it’s Adam. Except when I pick up the phone, he’s not there so I figured his stupid, once again broken phone accidentally called me. Back to sleep I went only to have my middle child come in at 6am and say it’s snowing. Yes, I heard that at 3:30am. I told her that was really cool (even though I thought there was barely anything on the ground) and I’d get up soon. 7am rolls around and Adam calls, AGAIN. He tells me to go outside and that when he left in the morning, it had really snowed a lot. I was not the happiest to say the least since I didn’t go to bed until almost midnight and was woken up repeatedly. After hanging up though, I finally dragged my ass out of bed and looked outside and WHAT THE HELL?!?! There was major snow in my neck of the woods!!! 1321We don’t own snow gear of course so we just went outside in our pajamas and boots. It really was like nothing I’ve ever seen. At least not here. I’ve been to the snow but my kids never have. And they absolutely loved it. The day was spent with them outside off and on because their little hands were turning red and frozen. So they kept coming back in to warm up. But it’s something we’ll never forget.

1346134313411329133413701366As for ringing in the New Year, we were of course pretty tired from the lack of sleep and the day’s activities so after spending an evening hanging out with some good friends, we headed home and I was out like a light. Dead asleep just after 11pm.

New Year’s Day brought some major changes in our house. We split up our two oldest girls who’ve shared a room for many years and moved our oldest into her own room. That was almost an all day affair because after having kids for 9 years, you accumulate an enormous amount of crap. We donated and threw away so much stuff. But the end result? Two happy girls who are excited for “bigger” rooms and their very own space.

And our annual New Year’s Day tradition of going to my parents house for fried pork chops, collard greens, black eyed peas and mashed potatoes continued. We stuffed ourselves (as we always do when we go over there) and were in bed watching TV by 8pm. It was a tiring couple of days!

Hoping you had a good NYE and New Year’s Day. 2015. Yep, it’s here!

Pasta with Creamy Pesto Sauce

With all of this holiday eating and cooking, making a big meal may not be your biggest priority right now. And you’re probably out of leftovers….. so, here’s a solution to still having a quick, easy, home cooked meal. It would take longer for you to call and order a pizza and wait for it to be delivered, than it would take to make this. This is a dinner we’ve had on our “Meatless Monday” nights. Yes, I’m aware it’s now Tuesday. But it’s great any time you need something fast.

Just be warned, I took pictures of this dish MONTHS and MONTHS ago. Like, almost a year. And I’ve just never posted it before. And the food was taken with my old phone. At night, when it was totally dark. So it’s really not the best picture you’ve ever seen. But make the food anyways, and you’ll see in person it’s much tastier looking than my crappy photography makes it out to be! 🙂


pasta ingredients

Don’t be alarmed by the date on the half & half. This is an old picture!

Pasta with Creamy Pesto Sauce

  • 1 lb. pasta, noodle type is your choice
  • 1/2 c. half & half
  • 1/3 c. prepared pesto sauce
  • 1 tomato, chopped

Cook pasta according to directions on box. In a small saucepan, add the prepared pesto and the half and half. Heat on medium low, until warm, and stir together. When pasta is cooked, drain and add to a bowl. Pour creamy pesto sauce over the top and add chopped tomato. Stir and serve.

It’s seriously that easy AND only 4 ingredients. Feel free to add some cracked black pepper or a little bit of grated parmesan but really, it has a ton of flavor already.pasta

Kitchen Essentials (Last Minute Gift Ideas)

This is for you procrastinators out there who still haven’t finished up your Christmas shopping. If you’re buying for someone who likes to cook, or just so happens to be lacking in the kitchen department, here’s a list of my top 5 kitchen essentials. These are items I use on a daily basis or very often and I’m pretty sure anyone would be happy to receive them. Well, they may be a little thrown off by receiving a Dutch oven but once that puppy is in their kitchen and in use, they’ll be glad you gifted it to them!

To make your shopping easier, I’ve added links to each item of the exact brand/model that I own.

dutch oven1. Dutch oven– I didn’t receive one of these until a few years ago. And my dad gave it to me as a gift. But, I absolutely love it! I wish I’d had this many years ago. This is probably my most used cooking vessel. I only make soups in this thing and it’s also great for any type of pulled meat, pork, beef, chicken. What’s convenient about this is that you can cook on the stovetop and then transfer it to the oven.

cast iron2. Cast iron skillet– This is a kitchen staple. Everyone needs a cast iron skillet. They are so versatile. Frying, cooking, baking. They pretty much do it all. We took ours all the way to Colorado when we went tent camping on a river and it was the ONLY pan I took. These things are heavy duty, incredibly resilient and a must in every kitchen.

kitchen 23. A good blender– After our old glass blender fell out of the top cabinet and onto my head, I was really in need of a new one. Not a new head, but a new blender. Impact with my hard head caused a crack on the base of the blender but surprisingly didn’t shatter or break the glass at all. Anyhow, my dad once again gifted me with an amazing blender. Yes, my dad gives me a lot of kitchen supplies. One, he encourages my cooking. Two, I think he had a kitchen shopping addiction there for awhile. Well, a good blender is also a must. Most people keep theirs in the cabinet (like I used to) but this newer one sits on my counter because I use it so often. Smoothies, shakes, salsa, dressings, etc.

knife4. Kitchen knives– These are so important! Adam got me a great set of knives a couple of years ago and I love them. They are lightweight, but sharp and also comfortable to hold. Mine don’t have a block which I was hesitant about because who doesn’t have a block of knives sitting on their counter? Well, I don’t. At least not anymore. These stay in their velvest-esque holders in a drawer and it actually is pretty convenient. If you’re looking for a less expensive and more introductory set, click here. Same brand that I use, but just a smaller set.

kitchen5. Flat whisk– I finally got this last year. Where has it been all my life?!?! I use it daily! It’s not cumbersome like a round whisk can be, and I like the smaller size. If you’re looking for something small and inexpensive, you’ve found it.

Happy shopping and Merry Christmas!

Monster Hens in the Hen House

Over the summer, our backyard chickens really slowed down on their egg production. I figured it was the heat. But lo and behold, they started molting. This is when they lose a lot of feathers and egg laying slows down because it takes a lot of energy to grow new feathers. Well, at first I thought they were dying. They looked awful and well, they had lost a lot of feathers so they were looking skinny and unhealthy. And I guess they’d molted before because we’d noticed loss of feathers in the past, but not to this degree. A little research (Google answers all my questions!) and I discovered this was completely normal for the time of year.

Well, we patiently waited for them to start laying again. And then we impatiently waited. Adam wanted to cook them up for Thanksgiving. Seriously, if I’d allowed it, he would’ve made it happen. But no way! We’ve had these chickens for a few years now and they’re more pets than anything. Unless a zombie apocalypse happens and I run out of food. Then it’s winner, winner, chicken dinner.

Anyways, they finally stopped losing feathers and grew back their new ones and now they basically look like hens on steroids. They are huge and healthy looking and complete monsters now. They bock incredibly loud. So loud that I’m afraid my neighbors will call the police on my confused hens who seem to think they’re roosters. And they’ve been bocking early. Like 6:30 am early, and then bock off and on for like an hour. It’s pretty annoying. I’ve discovered that means they want to be let out of their coop to roam. And eat. They eat incessantly. And they started laying eggs again. And their eggs are enormous. And the shells are strong. I read that after molting, the quality of the eggs is much better. And it’s so true! Before, their shells were getting thin but now, it’s such a difference. They’re like whole new hens! It makes me wonder if someone experimented on them while I wasn’t looking because these hens are vocal, hungry and huge.

hens

Our flock of New Hampshire Reds

This is Large Marge. She lives up to her name and is our biggest hen and lays the BIGGEST eggs. She's pretty. Pretty freakin huge.

This is Large Marge. She lives up to her name and is our biggest hen and lays the BIGGEST eggs. She’s pretty. Pretty freakin huge.

Now that I have an abundance of eggs again, it’s time to make more egg dishes. Here are some of my favorite recipes to use eggs in:

Chilaquiles

Breakfast Quesadillas

Vanilla Bean Croissant French Toast

Chicken Apple Hash with Fried Eggs

eggs

This is the first egg they laid after molting was over. And that white one is a store bought large egg.

eggs 2

Monster eggs

eggs 3

This is only half of what I currently have. Eggs for days!

And for those of you who’ve thought about trying out the backyard chicken thing, I recommend it! If you have cool neighbors. And if you don’t, a carton of eggs will usually put a smile on their face. But seriously, they’re an easy, manageable pet, and their poop makes great fertilizer!

Traditions

cookie time 3We have a tradition in our house. Close to Christmas, I bake a batch of sugar cookies and my girls decorate them. We’ve been doing this for the past few years and it’s just me and the three of them. They asked this year if daddy was going to help and I told them “It’s a girl thing”. And I’ll admit, it can be trying at times during the process because I happen to be a bit neurotic when it comes to my kitchen, i.e. I don’t like messes. But luckily, they’re pretty good about keeping it fairly clean. Plus, they like being able to do it on their own and it’s something they look forward to. And, they get to eat the fruits of their labor. So it’s a win/win for them.

I always let each kid pick out what cookie cutter they want and this year they chose a Christmas tree, a snowman and a gingerbread man. And although they really like decorating the cookies, I think their favorite part is actually when I roll out the dough, and they get to cut out the cookies.

cookie timecookie time 2cookie time 4I think they turned out pretty cute. And they taste really good too!

If you’re still on the hunt for the perfect sugar cookie recipe, click here. I’ve tried a few different ones and this one is a definite keeper. I haven’t altered or changed a thing about it. I follow it to a T and they turn out perfect every time!

Cheese Danish

danishOne of my weaknesses are canned biscuit products. Yep, you read that right. The sometimes scary pop of that can goes far back into my childhood. And I still love them. In particular, the buttermilk biscuits. I don’t want to know what’s in them! I’ve never even looked at the ingredients because there’s no way I’m giving them up. They’re a quick breakfast that I love drizzling honey on and although I usually stop myself after inhaling two, I could easily eat three no problem!

I also really like crescent rolls. Uh-huh. I do. I really, really do. My kids like ’em too. Sometimes I put some chocolate chips on them, roll them up and voila, chocolate “croissants”! But I recently made cheese danishes out of them and Hallelujah! They’re easy, cheesy (cream cheesy) and a nice little breakfast treat.

Cheese Danish (makes 8)

  • 2 tubes crescent rolls, separated and rolled to 8 rectangles
  • 1/2 of an 8 ounce package cream cheese, softened
  • 1/4 c. ricotta cheese
  • 1 egg yolk
  • Just under 1/4 c. white sugar
  • 1/2 tsp. vanilla
  • 1/4 tsp. lemon zest, optional

Preheat the oven to 375 degrees. In a stand mixer or if you don’t have one, a large bowl and use a hand mixer, add all the ingredients, except obviously the crescent rolls. Whip until combined. Add a large spoonful of the cheese mixture to each rectangle and fold the sides up toward the center, pinching together. Place on a baking sheet and bake for 10 minutes. Keep an eye on the danishes because the dough tends to burn on the bottom. When done cooking, remove from oven and let cool. Delish with a cup of coffee!!danish 2danish 3